Documentation
Medison
Medison is a lightweight cross-platform Rust audio recorder and editor.
Install
Download the zip for your platform from the home page, or fetch it from the command line:
curl -LO https://medisonaudio.com/downloads/Medison-0.1.0-macOS.zip && unzip Medison-0.1.0-macOS.zipDrag Medison.app to your Applications folder. The first time you open it, right-click the app, choose Open, then click Open again, because the app is not yet notarized by Apple. Windows and Linux builds are coming soon.
Transport Controls
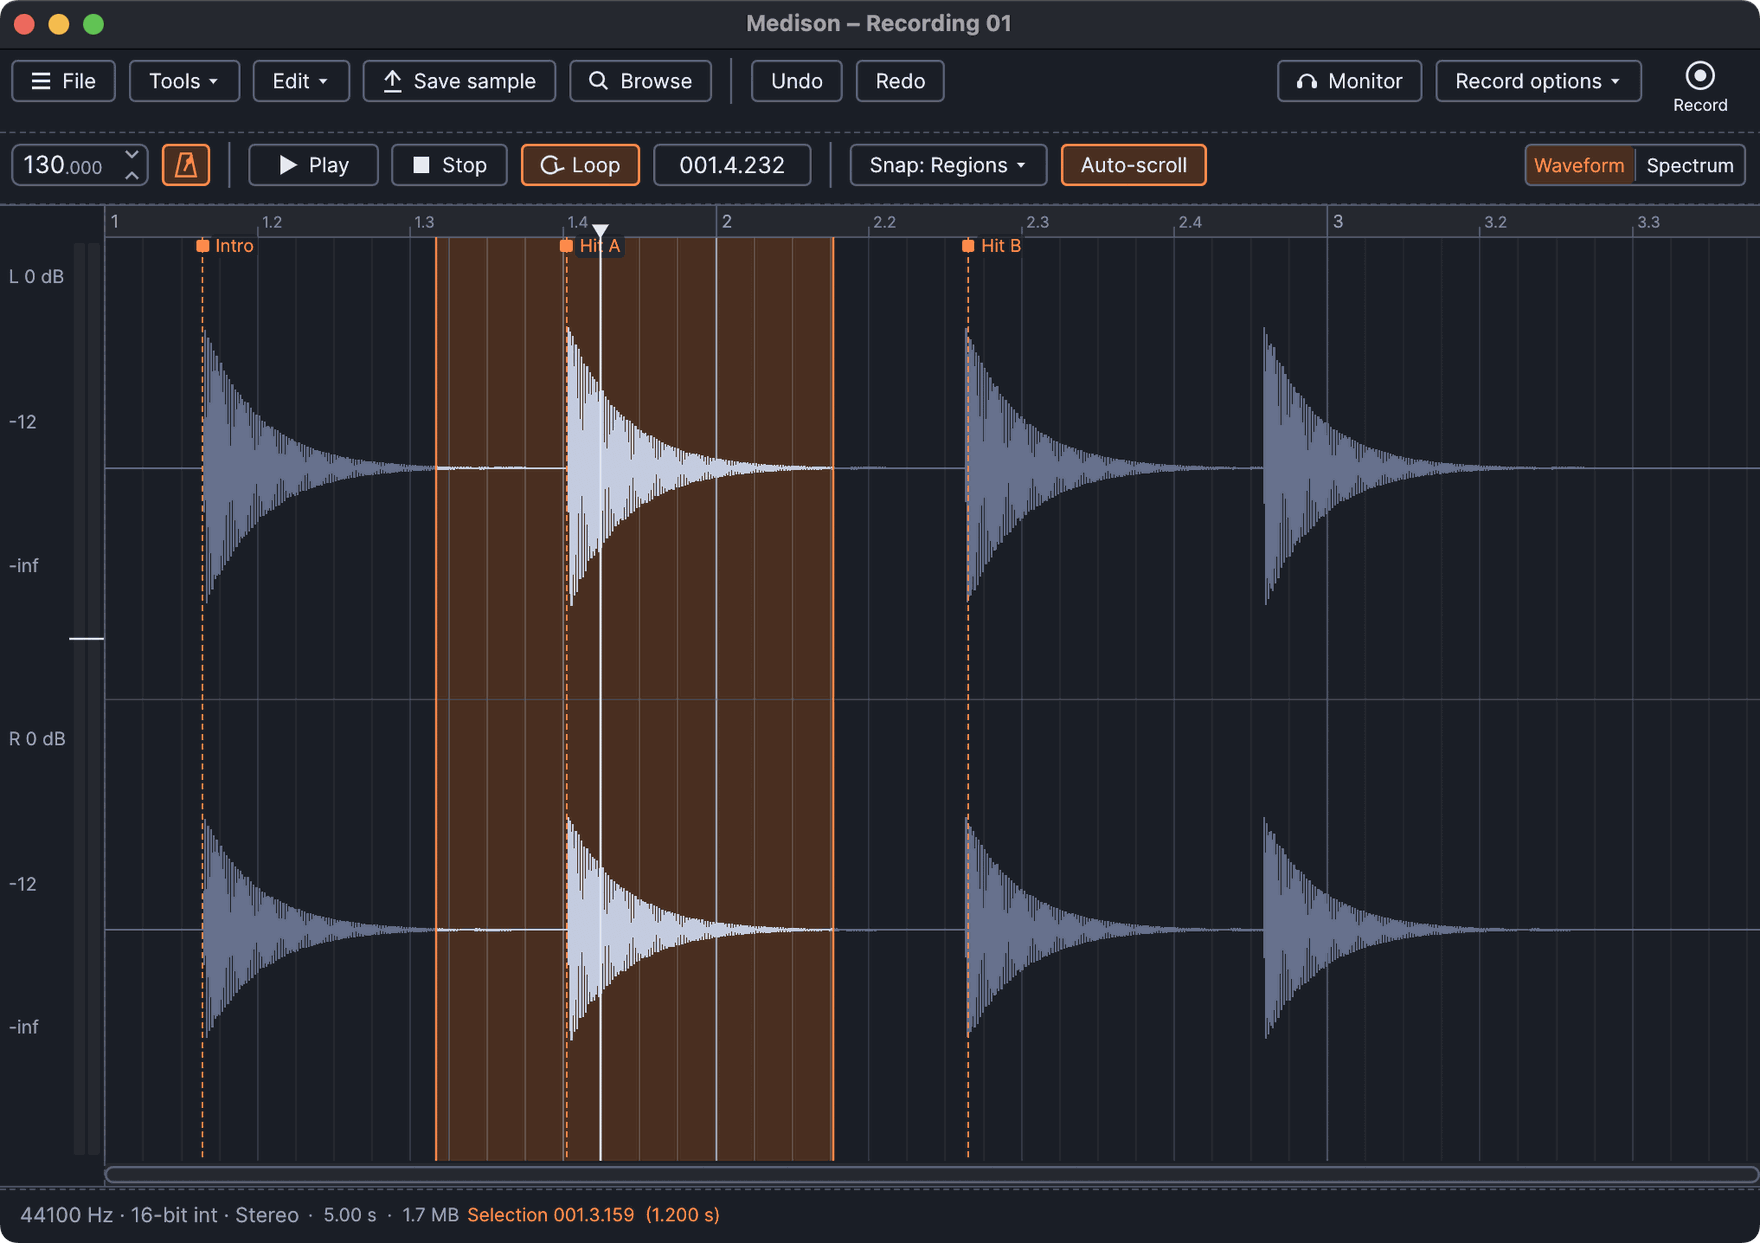
In the top-left section of the Medison window are several controls for the recording setup.
- Play - Press to play/stop the sample playback. The space bar will also start/stop playback when Medison is the active window (focused).
- Stop - Stops playback and returns cursor to the beginning of the sample or selection.
- Loop - Turns on loop playback for selections and loop-points. Selections take precedence over loop-points. Hold (Ctrl + Left-click) to place the play-head in the file without making a selection.
Tempo, metronome and playback
- Tempo (BPM) - The field to the left of Play sets the project tempo, from 20 to 999.999 BPM. Click it to type a value. Drag it up or down, scroll over it, or use its arrows to change it in whole numbers, and hold Shift for decimals. The grid, grid snapping and the metronome all follow this tempo. Loading a file with a tempo in its name, such as loop_165bpm or drums 90 bpm, sets it automatically.
- Metronome - The metronome button next to the tempo field plays a click on every beat, with a higher click on the first beat of each bar of four. It plays while you record and while you play back, and each click starts exactly on a grid line.
- Play - Press Space to play from the start of the selection, or from the play-head if nothing is selected. ShiftSpace plays at half speed, with the pitch dropping like a slowed tape. AltSpace turns on Loop and plays. While recording, Space stops the recording.
- Tape start and stop - Playback speeds up over a quarter of a second when you press play and slows down over a quarter of a second when you stop, like the reel of a tape machine. This can be turned off in Preferences.
- Stop - The first press stops and returns the play-head to the start of the selection. Press it again to deselect and return to the beginning of the waveform.
- Monitor - The headphones button next to Record options lets you hear the selected input through your output. Monitoring switches off when playback starts and comes back when playback stops. Use headphones to avoid feedback.
- Waveform / Spectrum - Switches the display. Shift-click the view you are not on to show both at once (dual view).
Recording Options
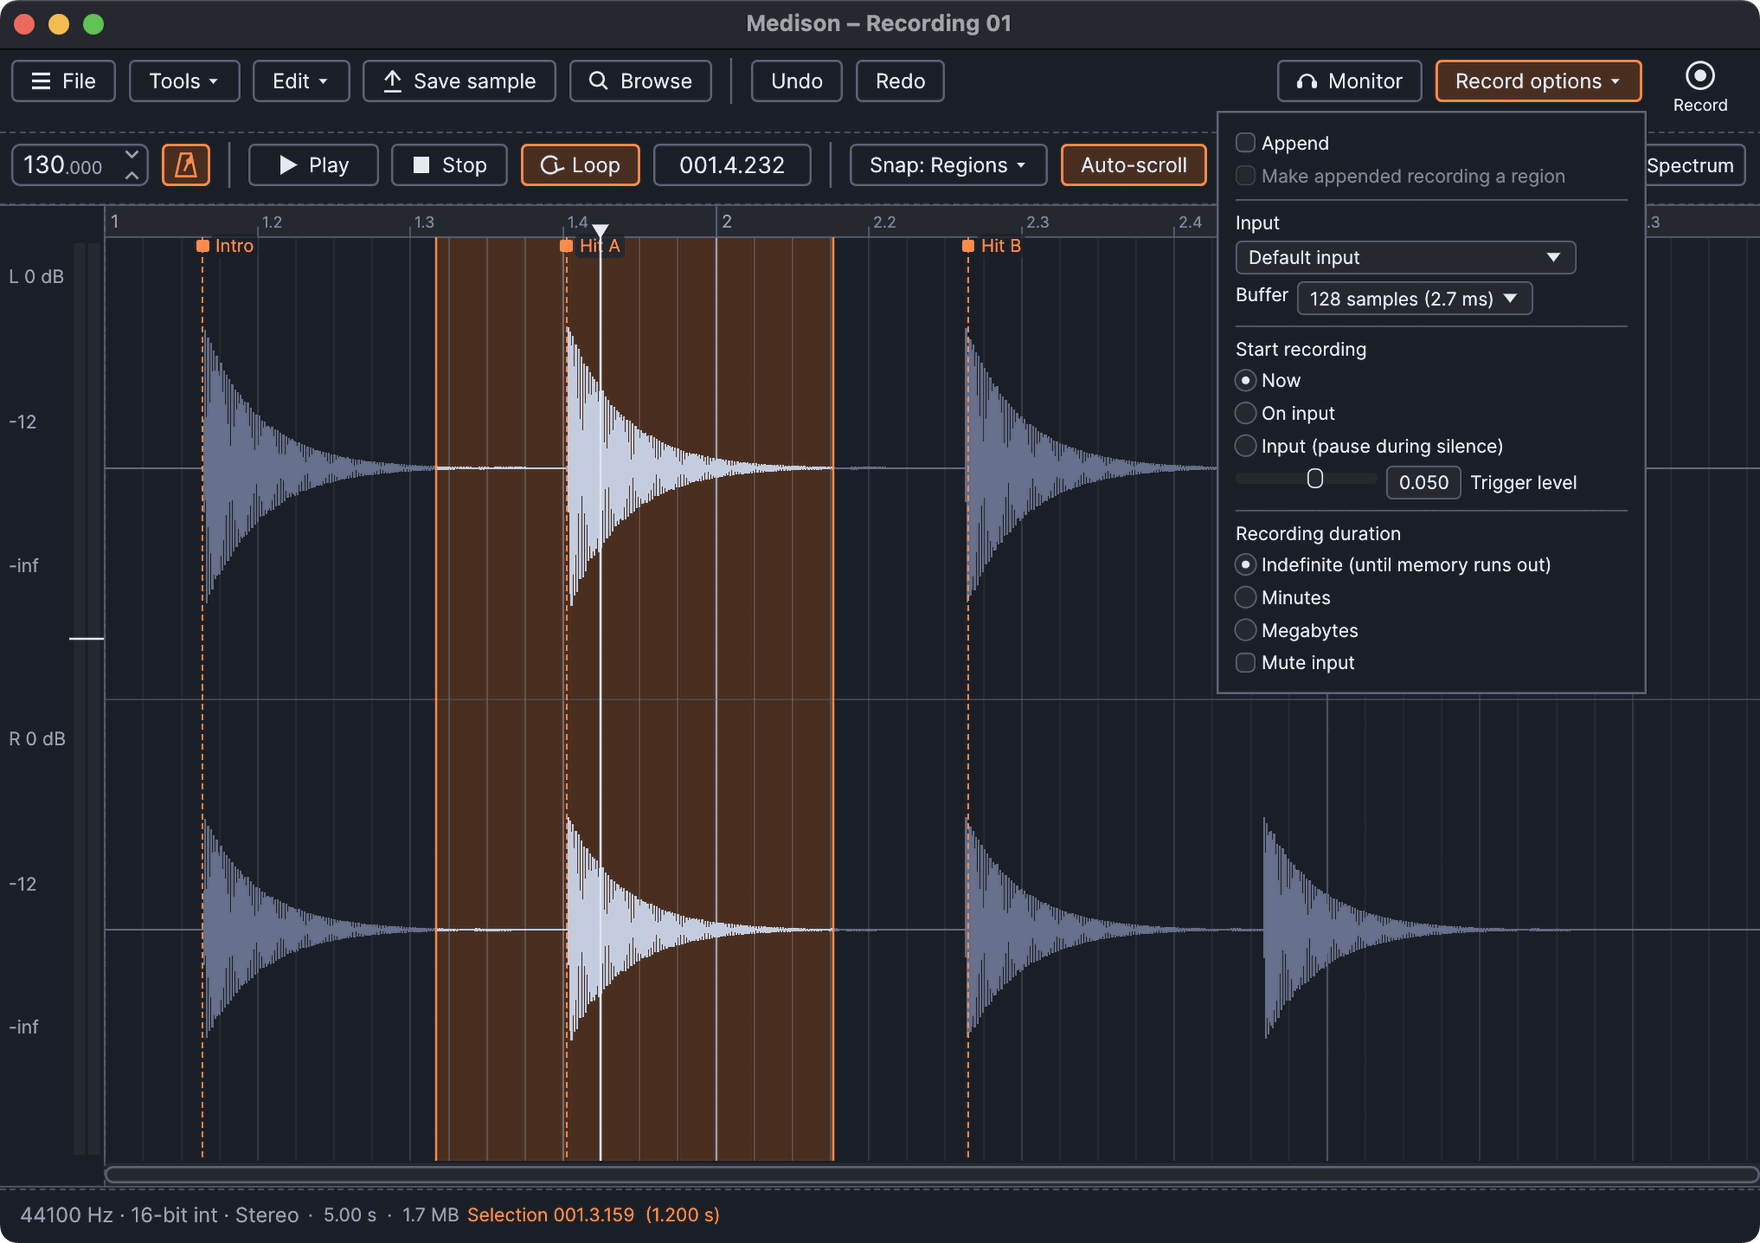
These options take effect when Record is selected from the Medison transport controls. Load Medison into one (or more) effects slot/s in any number of Mixer tracks and each instance will then record from that position. Alternatively it is possible to record directly into the Playlist.
- Append - Appends new recordings to the end of the existing data.
- Input - Selects which input to record audio from
-
Start recording selector:
- Now - Audio recording begins when the option is selected. To stop recording, de-select record mode.
- On input - Recording begins when an audio signal is received. To set the trigger level, Left-click on the Peak Meter and move the mouse up/down. NOTE: Medison uses a pre-record buffer so that transients will not be lost when a signal is received. In other words, you do not need to make a 'triggering' sound to guarantee early transients that may be below the trigger threshold.
- Input - Recording automatically pauses during silence and resumes on audio input. To set the trigger level, Left-click on the Peak Meter and move the mouse up/down.
- Record button - Arm Medison for recording (turns red when armed).
NOTES:
- Recording duration - When the time is exceeded, Medison will wrap and overwrite the previously recorded sample. The Minute/MB settings are useful for continuous background recording so that you don't miss stellar performances while jamming. However, be aware that recordings longer than 5 minutes use progressively more CPU during the wrap phase, slowing the user interface considerably.
- Memory - Medison operates exclusively in RAM (memory) and so is designed for working on samples or small songs, not recording hours and hours of audio. With RAM in mind, edit functions can require 4X the original sample space, so we recommend limiting samples to approximately 1/4 of free memory (there is an option 'Disable undo for large samples' that can help here). If you don't heed this warning your PC may explode, injuring bystanders, don't say we didn't warn you.
- Editing - These operations that require sample processing convert the source sample/s into 32-Bit float and at the samplerate of the highest wave in any group processed. This means that processed wave files are unlikely to be in the same format as the source samples, although you can set the sample format after you have edited the sample (as described below).
More recording options
- Make appended recording a region - With Append checked, the new recording is added as an unnamed region. Double-click the bar along the top of the region to name it.
- Record with Shift - Hold Shift while you press Record (or press ShiftR) to append that one recording to the end of the existing audio. Append goes back to how you had it when the recording stops.
- Monitor and buffer - The Buffer setting sets the audio buffer size in samples. Small buffers give the lowest delay, so raise it if the sound crackles. Audio interfaces that manage their own buffer keep it, and the setting is then disabled.
Memory Considerations
Medison operates exclusively in RAM (memory) and is designed for working with samples or small songs, not for recording hours of audio. 44.1 kHz, 32-Bit samples consume RAM at the rate of approximately 20 Meg per minute (1.2 Gig per hour) and edit operations can easily consume 4x the original sample size while processing the sample.
File
-
Open/Save options
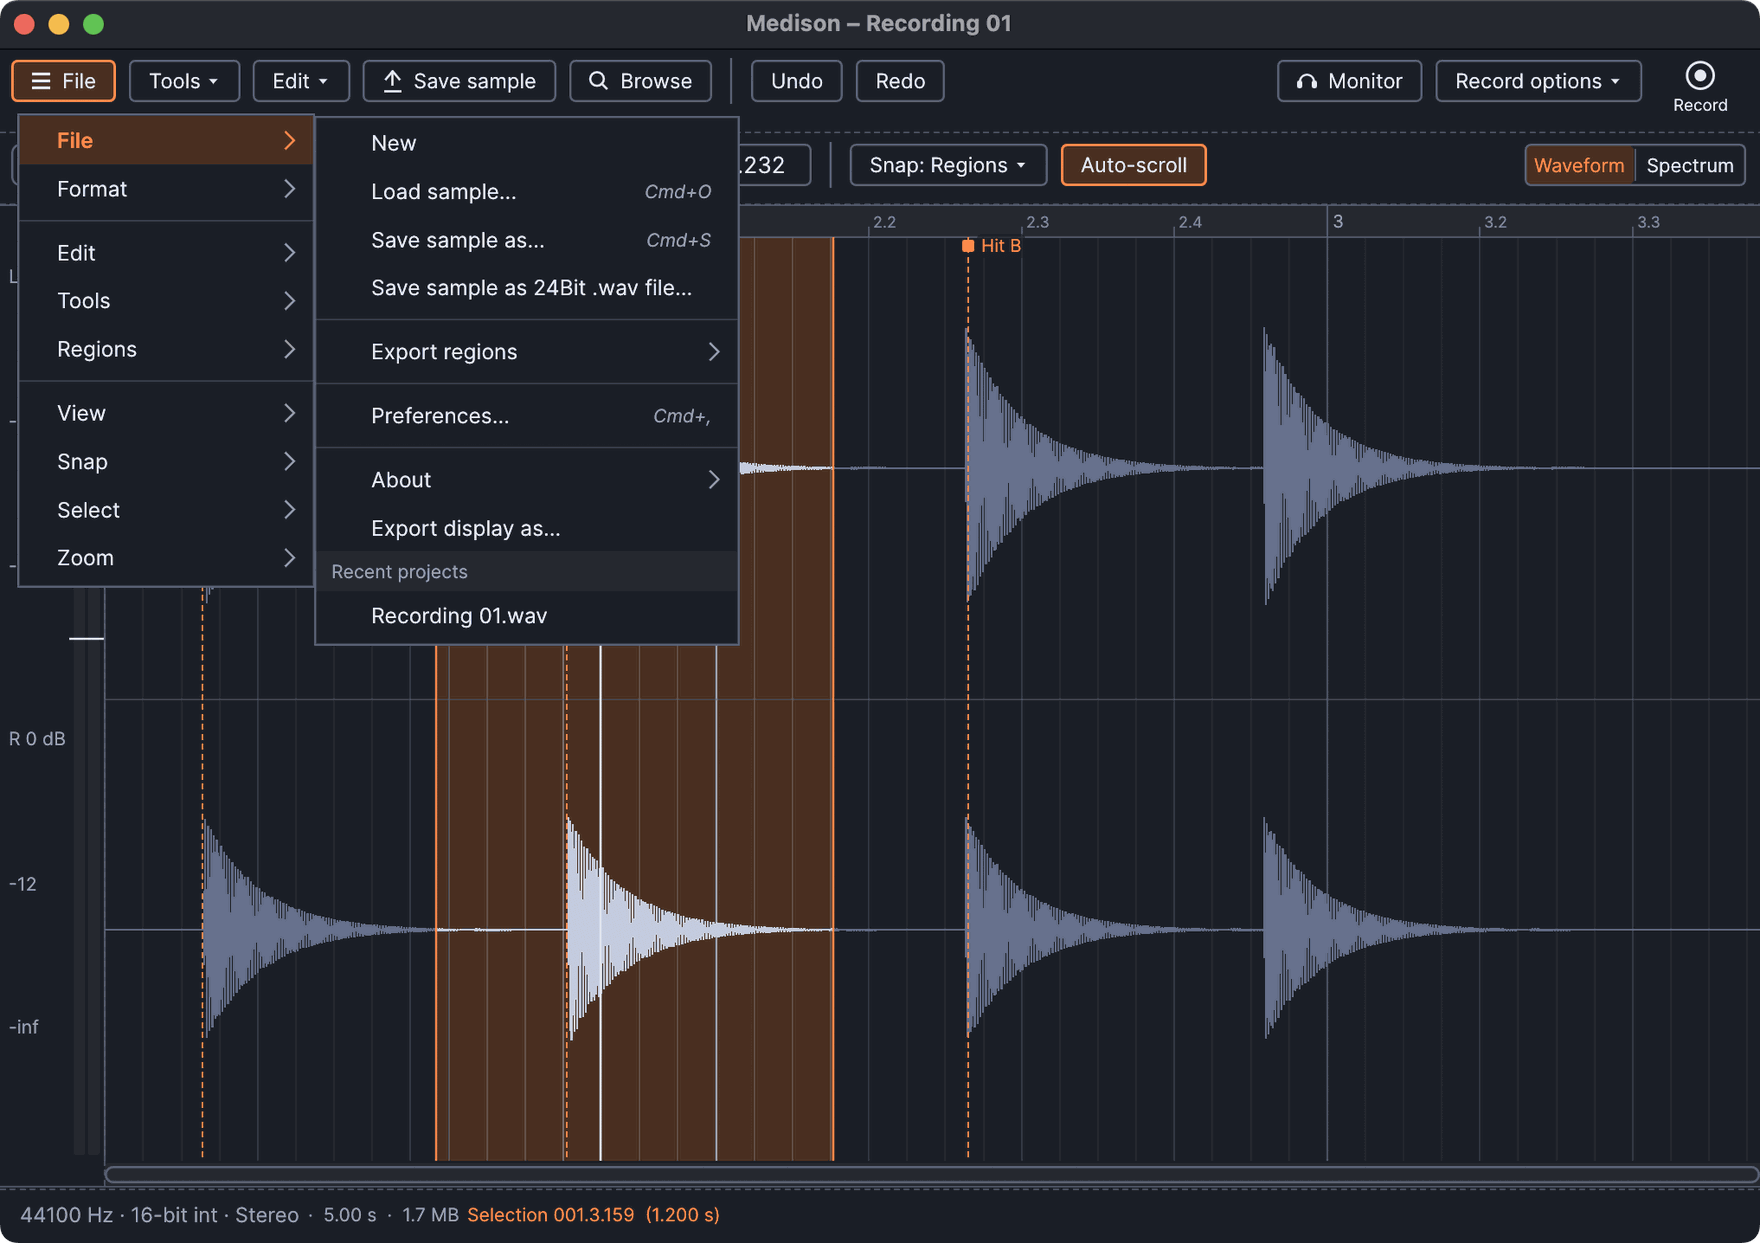
- New - Opens a new (empty) editor window.
- Load sample CtrlO - Opens a file browser dialog in 'load' mode.
-
Save sample as CtrlS - Opens a file browser dialog in 'save' mode. The pop-up dialog has two options under the 'Save as type' field.
- Microsoft wave file (*.wav) - Standard lossless .wav file at the bit-depth and sample rate set in the Sample Properties dialog.
- Microsoft compressed wave file (*.wav) - Lossy compression formats. After initiating the save a second dialog opens to save the sample in one of many compressed formats. MS compressed wave files simply wrap the selected compression type in a *.wav file, and put information in the wave header as to what decompression method the opening program should use (not all programs read this information). Medison will load and decompress MS compressed wave files automatically as long as you have the appropriate codec installed.
- MPEG 3 audio file (*.mp3) - Mp3 is a Lossy compression format. It has gained world-wide popularity because it was one of the first on the market that provided good quality lossy compression. After initiating a save a second dialog opens to select the quality (bit-rate), this controls the tradeoff between audio quality and file size. Good listening quality on portable devices starts at about 160 kbps, use 224 kbps or 320 (max) if you want something probably indistinguishable from CD quality.
- NOTE: Do not use any of the lossy formats (Microsoft compressed wave file, MPEG 3 or Ogg Vorbis) to archive project samples or loops. Use Microsoft wave files or WavPack in lossless compression mode if you want to save space. Hard disk space is cheap, samples may be irreplaceable.
- Save sample as 24 bit .wav file... - Use 24 bit format. Use when a collaborator or program you are working with does not support 32 Bit format (preferred).
-
Export regions - Both 'region markers' and/or consecutive 'location markers' will be treated as defining regions during 'Export regions'. A 'Marker' is a position flag, with an optional name, description and middle note. A 'Region' is a marker plus an end point. Right-click markers (tag at the top of the marker) to set a name, trigger note etc.
- For common use - Exports regions as simple wave files without root-note or pitch 'meta data'. The names of the markers at the start of each region are used to create the file name/s.
- For sampler use - Exports regions as wave files including root-note or pitch 'meta data'. The names of the markers at the start of each region are used as file names with root note added to the end. This is used by samplers like DirectWave to import multi-sample banks and auto-map them to keys.
- Export display as - Exports the wave display as a .png or .jpg image.
- Recent projects - Lists the 10 most recently opened projects.
Format
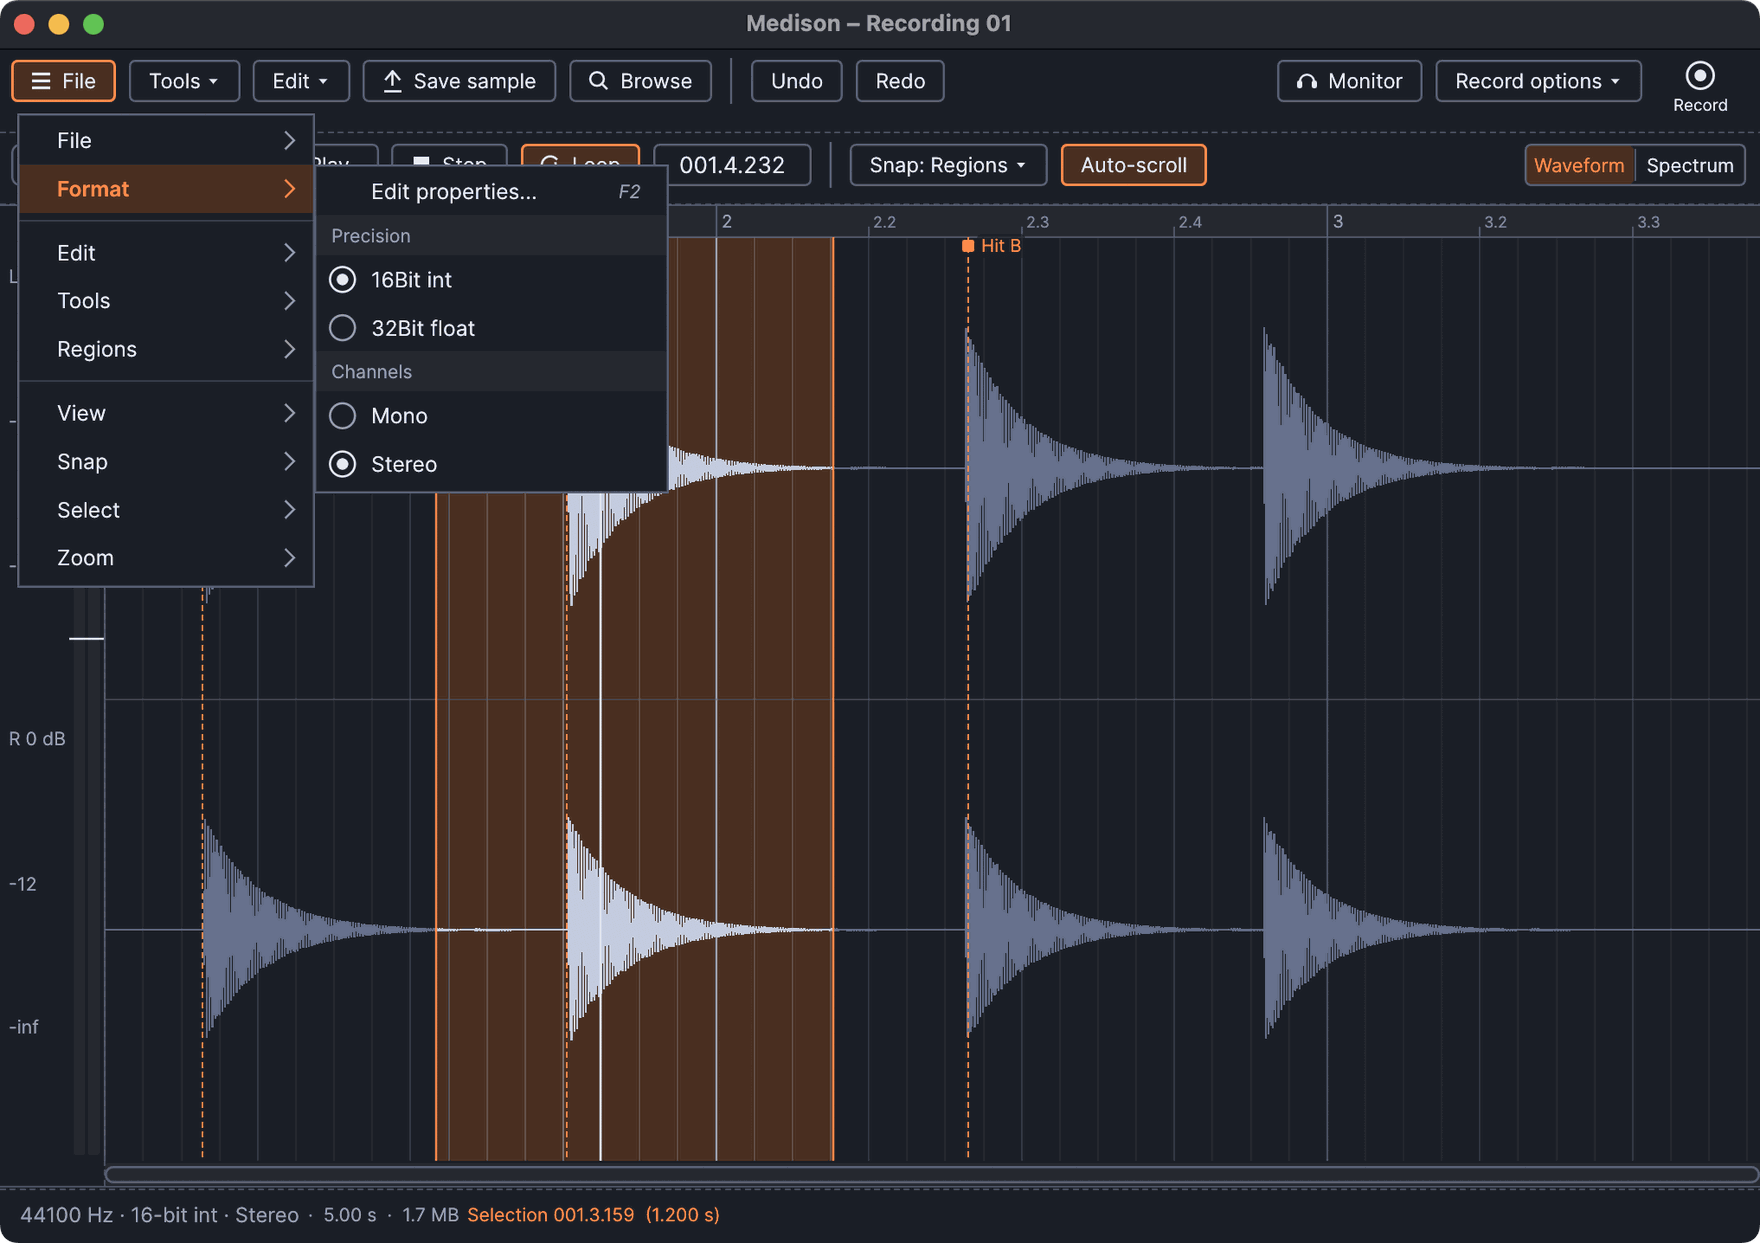
- Edit properties F2 - Opens the Sample Properties dialog where you can set the file properties.
-
Resolution
- 16-Bit int - Sets the file to 16-Bit integer format. This is CD audio standard.
- 32-Bit float - Sets the file to 32-Bit floating point format. This is the native format for Medison audio processing.
-
Channels
- Mono - Sets the file to Mono.
- Stereo - Sets the file to Stereo. Mono files will be saved with L and R channels containing the same data.
Edit
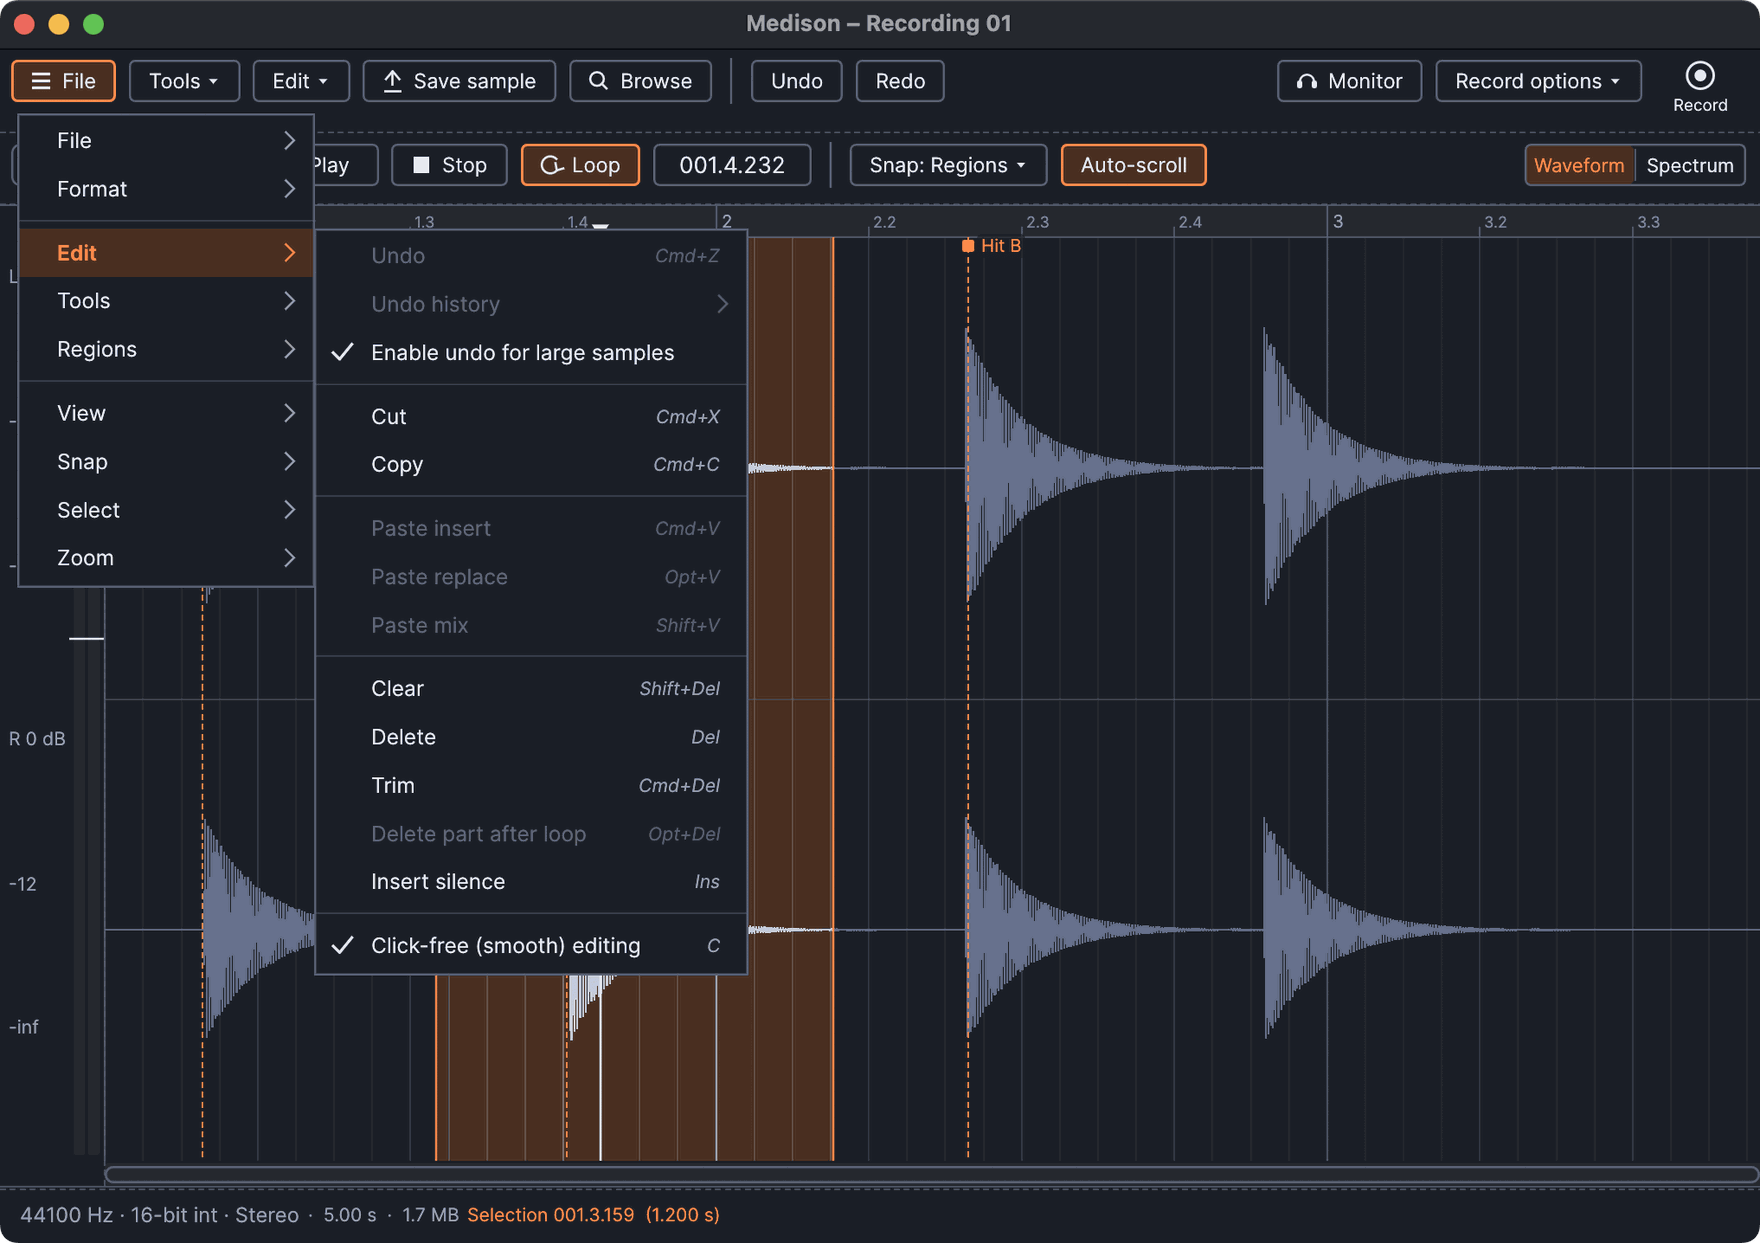
Many of the actions in this menu work on a selected region. To select a region, Left-click in the sample window and drag horizontally. To move the start point, Left-click near the start of the region and drag to a new point. To move the end point, Left-click near the end of the region and drag to a new point. At any time you can zoom the window using the mouse-wheel.
- Undo (item) CtrlZ - The first item in this menu indicates the last action performed.
- Undo history - Displays the last 10 actions.
- Enable undo for large samples - Allows undo for samples larger than 16 MB. This is useful for saving memory and CPU when working on very large samples.
- Cut CtrlX - Cuts the selected region.
- Copy CtrlC - Copies the selected region.
- Paste insert CtrlV - Inserts the copied sample at the start of the selected region.
- Paste replace AltV - Replaces the selected region with the copied sample. The duration of the copied sample determines how much of the region will be replaced.
- Paste mix ShiftV - Mixes the copied sample with the selected region. The duration of the copied sample determines how much of the region will be mixed.
- Clear ShiftDel - Clears the selected region, leaving the rest of the sample unchanged. Consider this a mute function.
- Delete Del - Deletes the selected region. This function will change the overall length of the sample.
- Trim CtrlDel - Deletes the region outside the selection.
- Delete part after loop AltDel - Deletes sample data after the loop end point.
- Insert silence Ins - Inserts silence from the region start point of a length equal to the selected region.
- Click-free (smooth) editing C - Switch, prevents audio clicks/pops in samples caused by edit functions. This option avoids the clicks caused by discontinuities in the sample amplitude at cut/splice points by fading, or crossfading, edit points by a few samples.
Undo
Every edit can be undone with CmdZ and redone with ShiftCmdZ. Undo also selects again the part of the waveform you had selected when you made the edit. Undo is available for large samples by default, up to 10 steps or about 1.5 GB of saved copies.
Tools
-
Amp
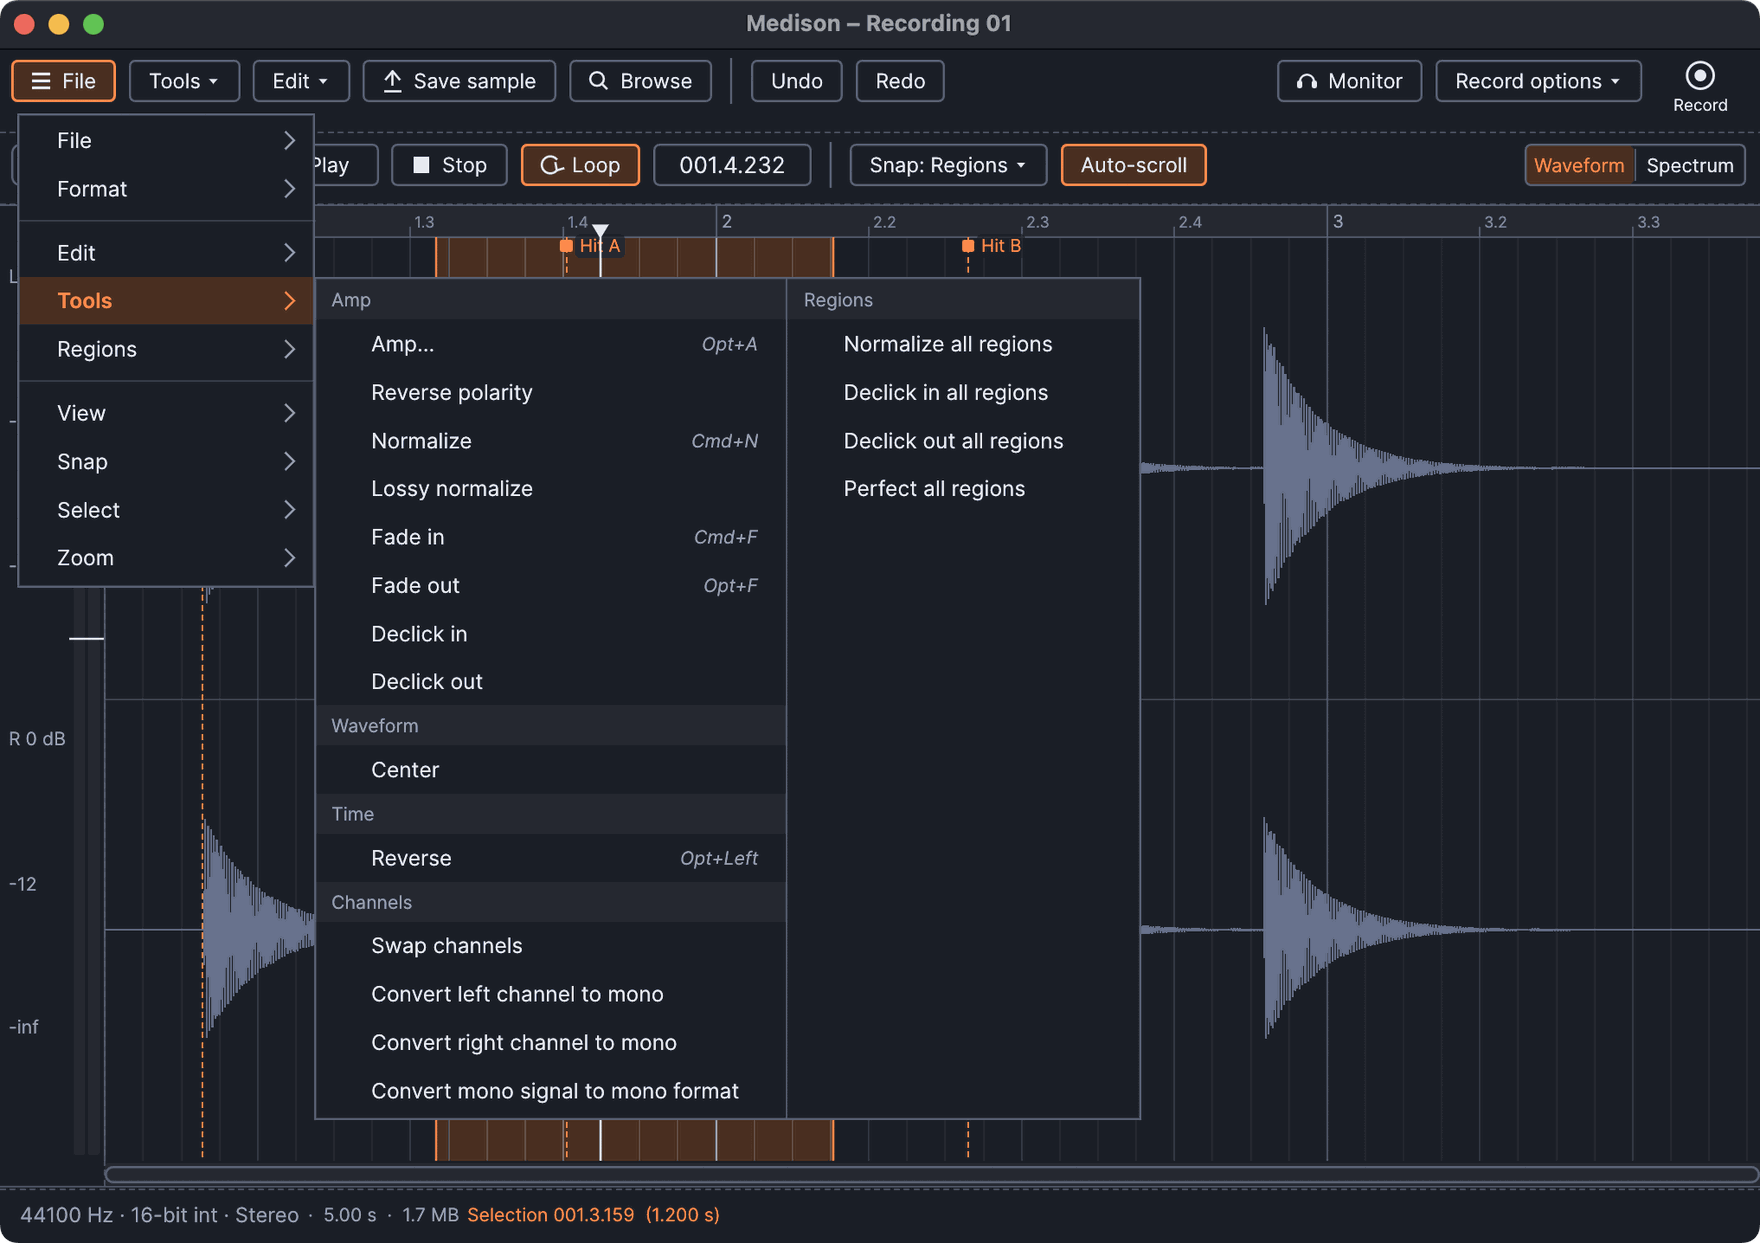
- Amp AltA - Opens the Amplitude Tool that allows you to modify L/R channel volume, Panning and Stereo Separation.
- Reverse polarity - Inverts the phase of the waveform.
- Normalize CtrlN - increases the amplitude of the waveform so that the loudest sample is at 100% maximum possible level. The process works by determining the multiplication factor that will make the loudest sample reach 100%, then multiplies all samples by this value, rescaling them.
- Lossy normalize - Similar to the standard Normalize, the amplitude of the waveform is increased so that the loudest sample is at 100% maximum possible level. There is an additional manipulation of the waveform phase that can sometimes tease out a few more dB gain. The process is considered 'lossy' as it changes the waveform phase, although it should sound identical to the standard Normalization.
- Fade in CtrlF - Ramps up the volume from 0% to 100% using a logarithmic curve. If a region is selected the fade function will apply to that, if not, the entire sample will fade in.
- Fade out AltF - Ramps down the volume from 100% to 0% using a logarithmic curve. If a region is selected the fade function will apply to that, if not, the entire sample will fade out.
- Declick in - Smooths clicks at the beginning of a selection.
- Declick out - Smooths clicks at the end of a selection.
-
Waveform
- Center - Removes DC offset. The average amplitude of the waveform is shifted to be at the zero crossing.
-
Time
- Reverse AltLeft - Reverses the entire wave or selection.
-
Channels
- Swap channels - Swaps the left and right channels.
- Convert left channel to mono - Converts the sample to a mono file based on the left channel.
- Convert right channel to mono - Converts the sample to a mono file based on the right channel.
- Convert mono signal to mono format - Converts the file to a mono format if both left and right channels are equal.
-
Regions
- Normalize all regions - Normalizes all regions to the loudest region in the selection. This equalizes the peak levels of the selected Regions. If you want actual normalization, where regions peak at 100% of the available amplitude, run the standard Normalize tool after using Normalize all regions. TIP: You can quick access this feature by (Right-Click) the Normalize icon in the Toolbar.
- Declick in all regions - Remove clicks from the start of regions (works by creating a very fast fade-in).
- Declick out all regions - Remove clicks from the end of regions (works by creating a very fast fade-out).
- Perfect all regions - Declicks the start and end of all regions (as described above).
Regions
-
Regions
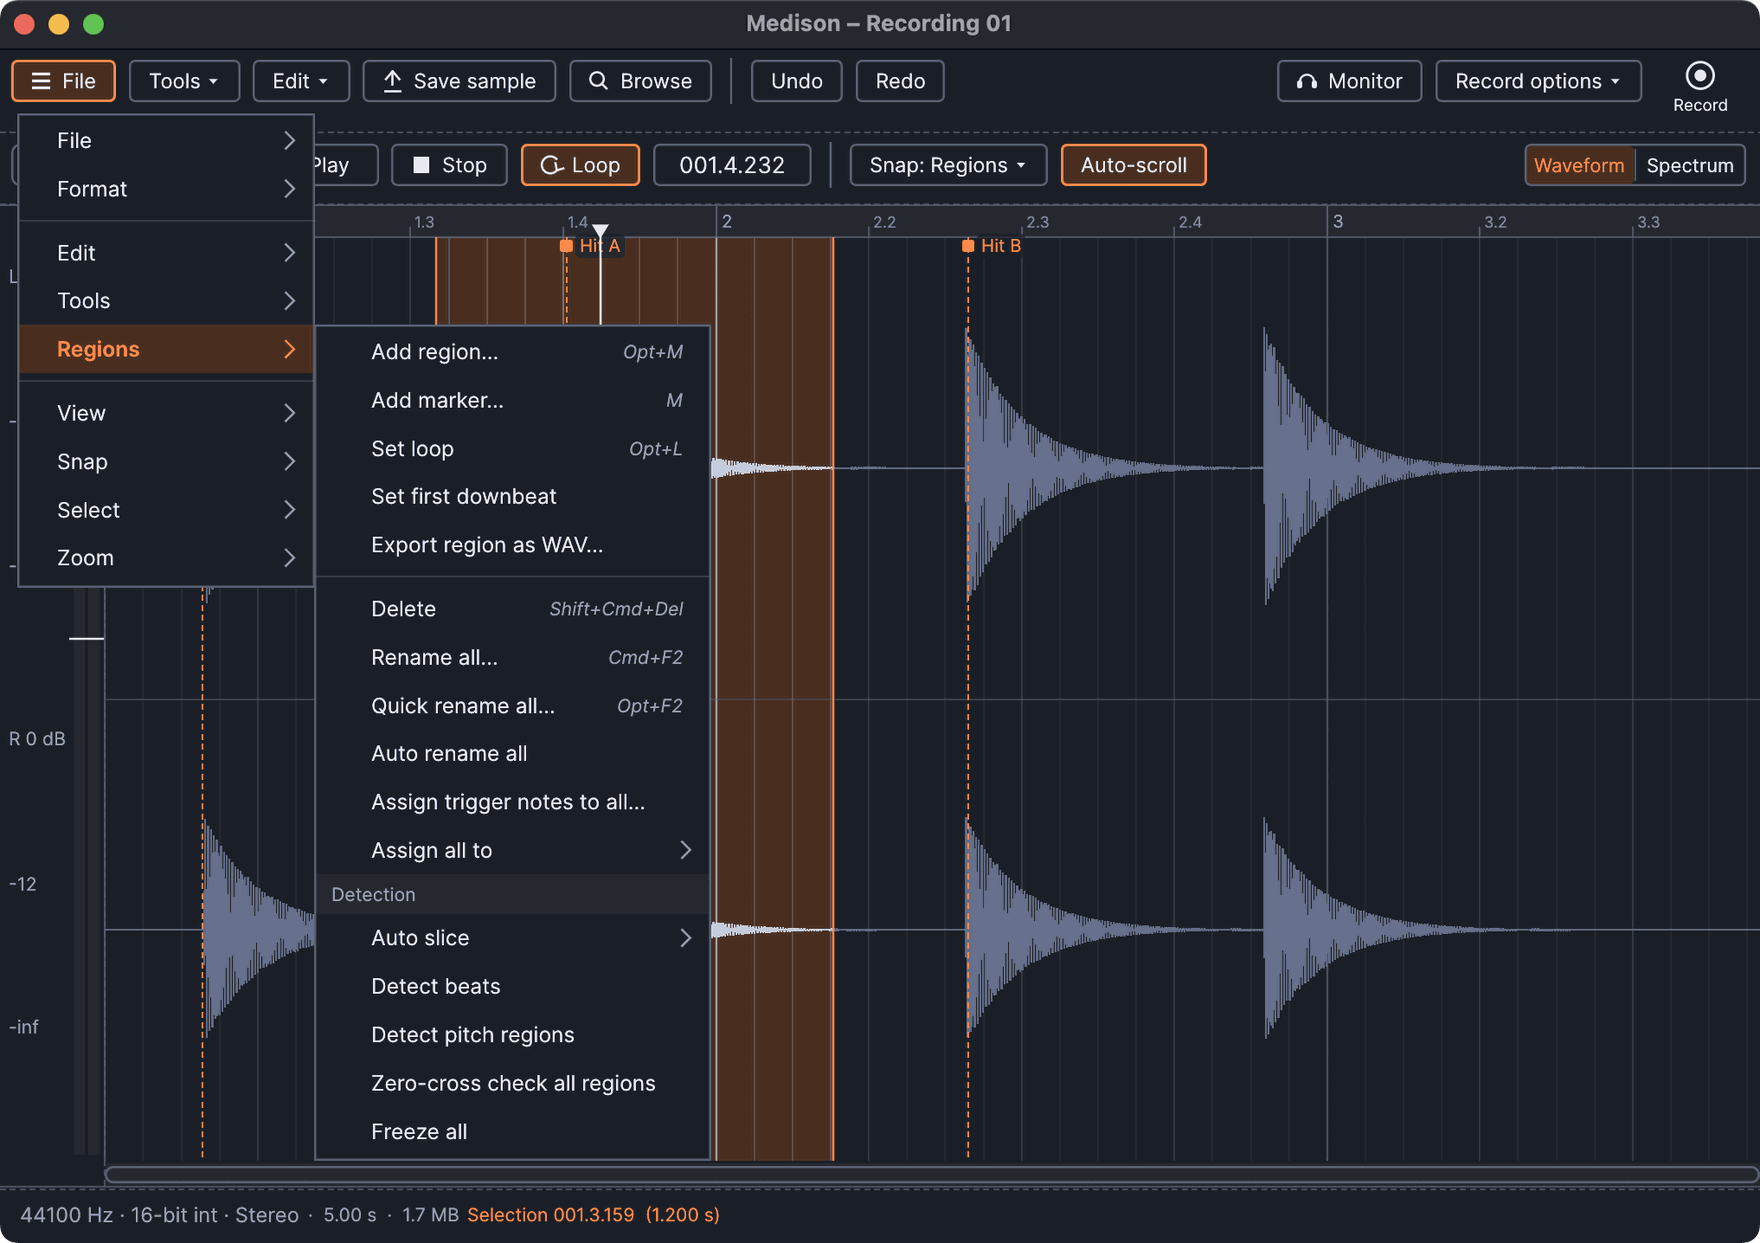
- Add region AltM - Adds region start and end markers at the boundaries of the defined region.
- Add marker M - Adds a single marker at the start of the selected region. This can be dragged to a new position by the square handle at the top of the marker.
- Set loop AltL - Defines the selected region as a loop. Special red loop markers will appear.
-
Set first downbeat - Adds a Downbeat marker at the start of the selected region. The marker is used to align Audio Clips to the Playlist grid. The marker can be dragged to a new position by the square handle at the top of the marker. Quick method:
- Manual Downbeat & Grid alignment - Right-Ctrl + Right-Shift + Click on the location in the sample where the first downbeat marker is to be set, hold and drag horizontally to fine-tune the position if needed. Then, release the mouse button and click again with the Right-Ctrl + Right-Shift keys still held (drag left/right) to adjust the grid spacing to align the grid to the beat.
- Delete ShiftCtrlDel - Deletes the selected region, loop or marker.
- Rename all CtrlF2 - Steps through the regions in the editor allowing them to be named.
- Quick rename all AltF2- Steps through the regions in the editor providing quick name options, allowing all regions to be named.
- Auto rename all - Automatically renames all regions based on an audio analysis of the waveforms. This function is designed to work with percussion sounds and works best when there are clearly distinct hits.
- Assign trigger notes to all - Automatically steps through the regions/slices allowing you to assign trigger notes to each region. Trigger notes are the MIDI note numbers that will play the specific region.
- Assign to all - Choose to automatically assign regions to: Whole Keyboard, White Notes, Black Notes or None.
-
Region marker Right-click options - From the Editor Window Right-click markers to access the following menu:
- Delete - Delete the selected Marker.
- Clone as region - Duplicates the region markers. The new Markers will be overlaid on the original ones, ready to drag to a new location.
- Turn into marker - Turns a region into a single Marker. The end Marker will be deleted.
- Rename - Rename a Marker.
- Quick rename - Choose from a menu of preexisting labels.
- Set info - Add notes to Markers.
- Purpose - Choose from Basic, Beat, Downbeat, CD track, CD index and Single Cycle. This information will ne added to exported WAV files and be available for plugins or software that use this data. For example, setting markers as CD tracks will allow you to export a WAV file that will be seen by CD players as separate tracks at each marker.
- Trigger note - Set note that triggers the slice. Will also be saved with exported Slices to WAV files.
- Select - Select the Marker/region.
- Zoom on - Zoom to the selected Marker, full display width.
-
Detection
-
Auto slice
- Dull auto-slicing - Few slices/regions. Auto-sclicing is based on peak detection, and so requires peaks in the sample associated with beats to work correctly.
- Medium auto-slicing AltS - More slices/regions.
- Sharp auto-slicing - The most slices/regions.
- Small grid-slicing - Slices the sample according to the small grid lines.
- Medium grid-slicing - Slices the sample according to the medium grid lines.
- Large grid-slicing - Slices the sample according to the large grid lines.
- Detect beats - Detects beats and slices according to regions assigning downbeat and regular beat markers.
- Detect pitch regions - Detects and slices according to regions of constant pitch.
- Zero-cross check all regions - Moves the region markers to the nearest zero-crossing. Removes clicks at the start and end of the regions.
- Freeze all (switch) - Prevents region editing.
-
Auto slice
Naming regions and markers
- Adding - Add region and Add marker ask for a name. A blank name is fine.
- Renaming - Double-click a region's name label, or the bar along the top of the region, to rename it. A marker's label works the same way.
- Auto slice - Auto slice and grid slicing ask for a name for the slices. Left blank, they are called Marker #1, Marker #2 and so on.
- Exporting - With a region selected, or from the right-click menu on its marker, choose Export region as WAV... to save just that region.
- Right-click menu - Right-clicking anywhere on the waveform opens the same menu as the File button, a little more condensed. Right-clicking a marker or region gives its own menu.
View
-
Audio
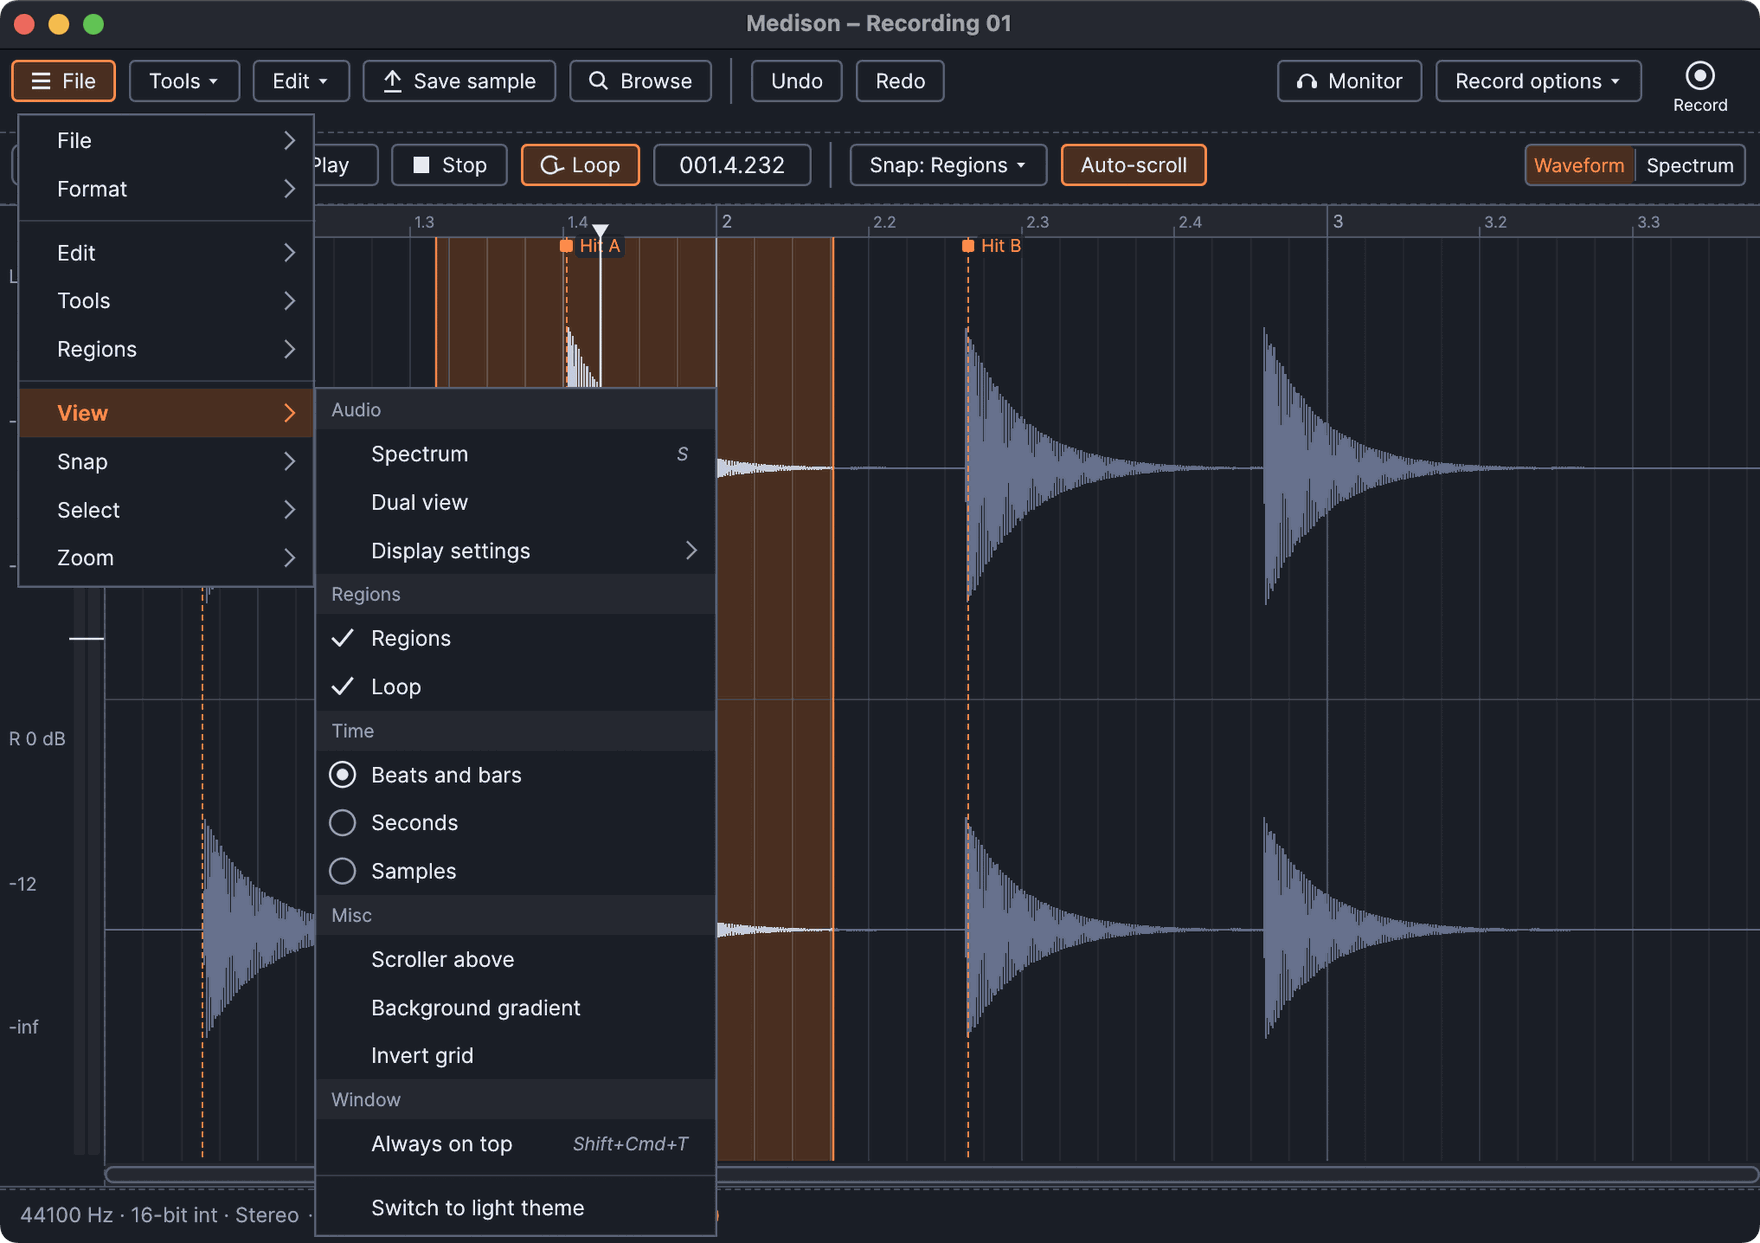
- Spectrum S - Selects spectrum view. This display mode shows time on the horizontal axis and frequency on the vertical axis. Brighter or more saturated colors (depending on the spectrum gradient options) represent louder frequencies.
- Dual view - Shows both the spectrum and waveform views superimposed.
-
Display settings - Change the appearance of the spectrum display mode.
- Coloring - Color is mapped to the predominant frequencies in the audio. Reds are lower frequencies such as bass or the sustain of kicks, blues are higher frequencies such as transients and the splash of cymbals. There is a color gradient from red to blue as there frequencies from low to high.
-
Waveform channels - Note that in stereo mode L and R channels are superimposed with slightly different colors (zoom to view more clearly).
- Mono - Display a single (L/R averaged) waveform.
- Multichannel - Display all channels (superimposed).
- Left - Display Left channel.
- Right - Display Right channel.
- Spectrum precision - 32, to 8192 bands. This is the number of vertical slices the frequency domain is divided into, higher numbers provide more detailed analysis. Resize Medison to obtain an overall larger view.
- Natural scale - Sets the vertical scale to reflect the musical 'octave' relationship of frequencies (a logarithmic scale). This will stretch the lower frequencies to occupy a greater area and so is particularly useful when working with frequencies below 500 Hz.
- Natural weighting - Sets the color intensity gradient to better represent the way we hear frequencies. Specifically, it changes the brightness weighting from white noise, a linear relationship between frequency and display brightness to pink noise. Pink noise decreases the intensity by 3dB/Octave, making it more suitable for musical uses as the higher frequencies no longer dominate the spectral display brightness, which is closer to how we hear those same frequencies.
- Enhanced Frequency/Time - These options improve the visibility of details particularly at lower frequencies. These options work well with a spectrum precison of 1024.
- Draft - Less visibility of details in favor of quicker graphics responsiveness.
- Spectrum gradient - 12 dB steps, Charcoal, Furnace, Deeper furnace, Glacier, Temperature, The Matrix. Choose the theme that reveals the most detail in the sound or that appeals to you.
-
Regions
- Regions - Turns region markers on/off.
- Loop - Turns loop markers on/off.
-
Time
-
Time in samples - Displays the time-base in samples. This information is displayed to the bottom left of the peak meter. Right-clicking the time display opens a context menu showing -
- Deselect Up arrow - Deselects the current selection.
- Select before current selection - Selects the area before the current selection.
- Select after current selection - Selects the area after the current selection.
- Select zoomed part CtrlA - Selects the region defined by the visible sample.
- Select previous region Left arrow - Selects the previous region.
- Select next region Right arrow - Selects the next region.
-
Time in samples - Displays the time-base in samples. This information is displayed to the bottom left of the peak meter. Right-clicking the time display opens a context menu showing -
-
Misc
- Scroller above - Places the Zoom / Scroll bar X above the sample.
- Background gradient - Applies a 3D background effect to the sample edit window
- Invert grid - Inverts the background colors
Time, spectrum and window
- Time - The ruler and the time display show beats and bars by default, or seconds, or samples. The grid is always aligned to the beats and bars of the project tempo, whichever is shown.
- Spectrum - The spectrum shows frequency from 0 Hz up, over a 120 dB range, with a frequency scale on the left and the grid drawn on top. Display settings has a logarithmic scale, the other color schemes and the number of bands.
- Always on top - Under Window, ShiftCmdT keeps Medison above other apps, so you can start, stop and edit a recording made in another program.
Snap
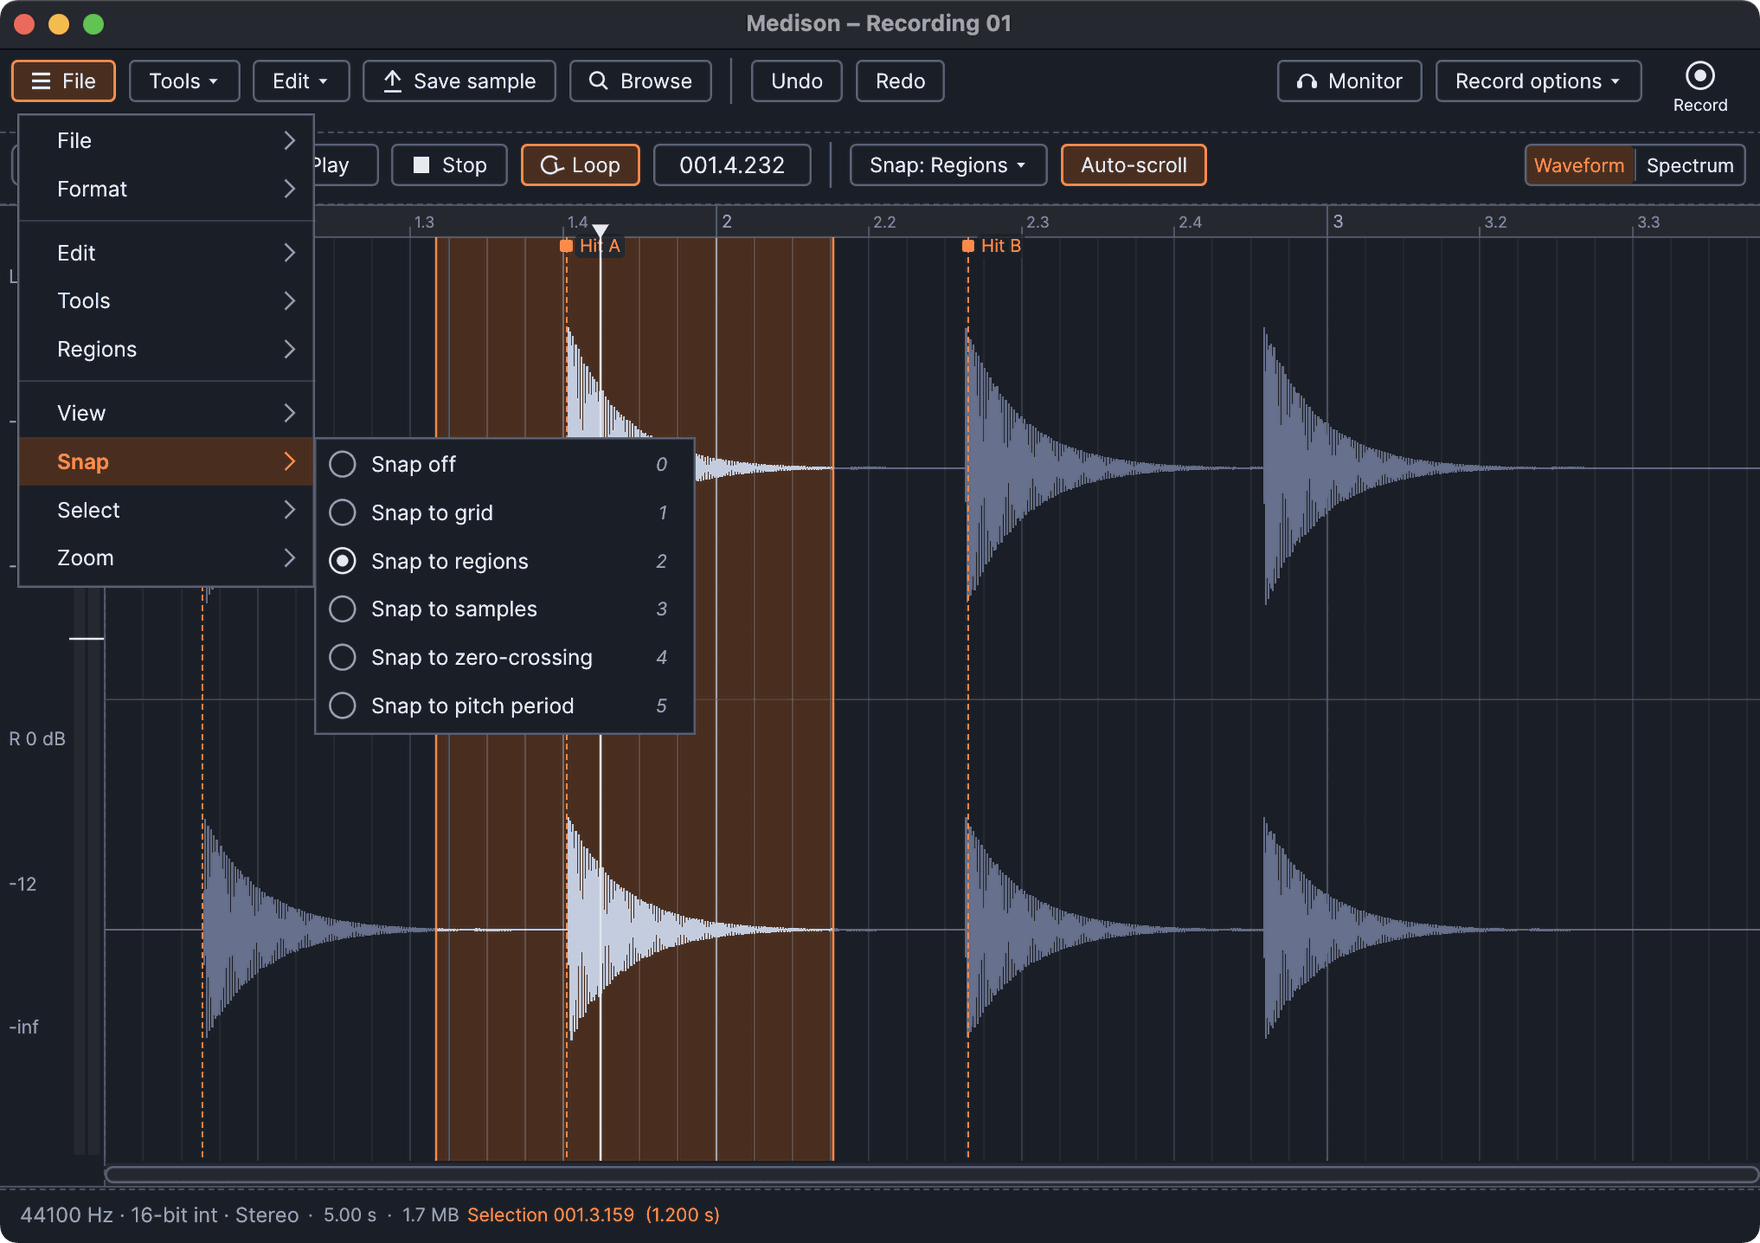
- Snap to grid 1 - Envelope points and selections snap to the background grid.
- Snap to regions 2 - Envelope points and selections snap to the region markers.
- Snap to samples 3 - Envelope points and selections snap to samples.
- Snap to zero-crossing 4 - Envelope points and selections snap to zero crossings. This is the point where the waveform crosses the 0 amplitude line and is useful to avoid clicks.
- Snap to pitch period 5 - Envelope points and selections snap to the period of any pitch detected at the selection point.
- Snap off 0 - Turns snapping off. This is how Medison starts.
Only one snap option can be active at a time. Choosing the active option again turns snapping off.
Select freely while snapping: hold Cmd (Ctrl on Windows and Linux) while you drag a selection or move its edges to ignore the snap setting, as if Snap were off. Release the key to return to snapping. Cmd+click also places the play-head exactly where you click.
Select
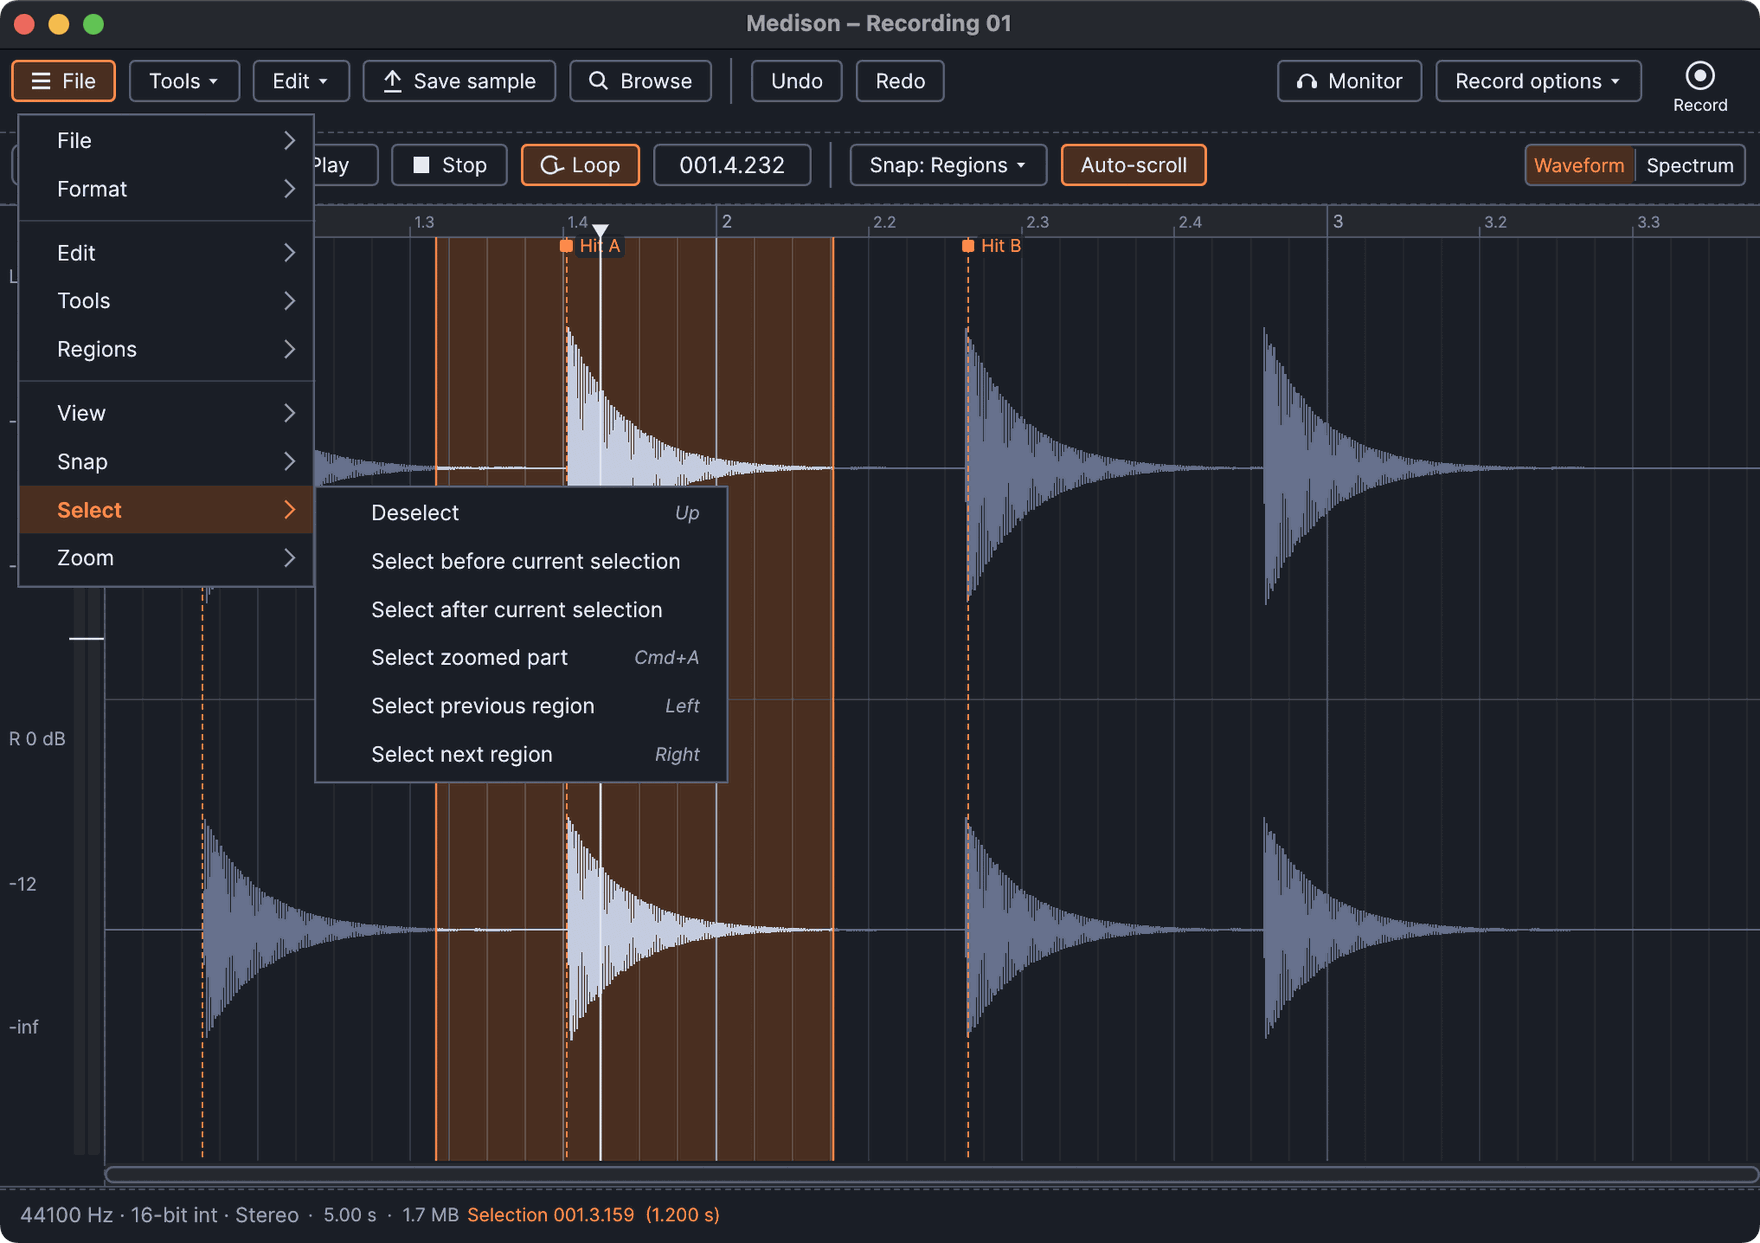
- Deselect Up arrow - Deselects the current selection.
- Select before current selection - Selects the area before the current selection.
- Select after current selection - Selects the area after the current selection.
- Select zoomed part CtrlA - Selects the region defined by the visible sample.
- Select previous region Left arrow - Selects the previous region.
- Select next region Right arrow - Selects the next region.
Zoom
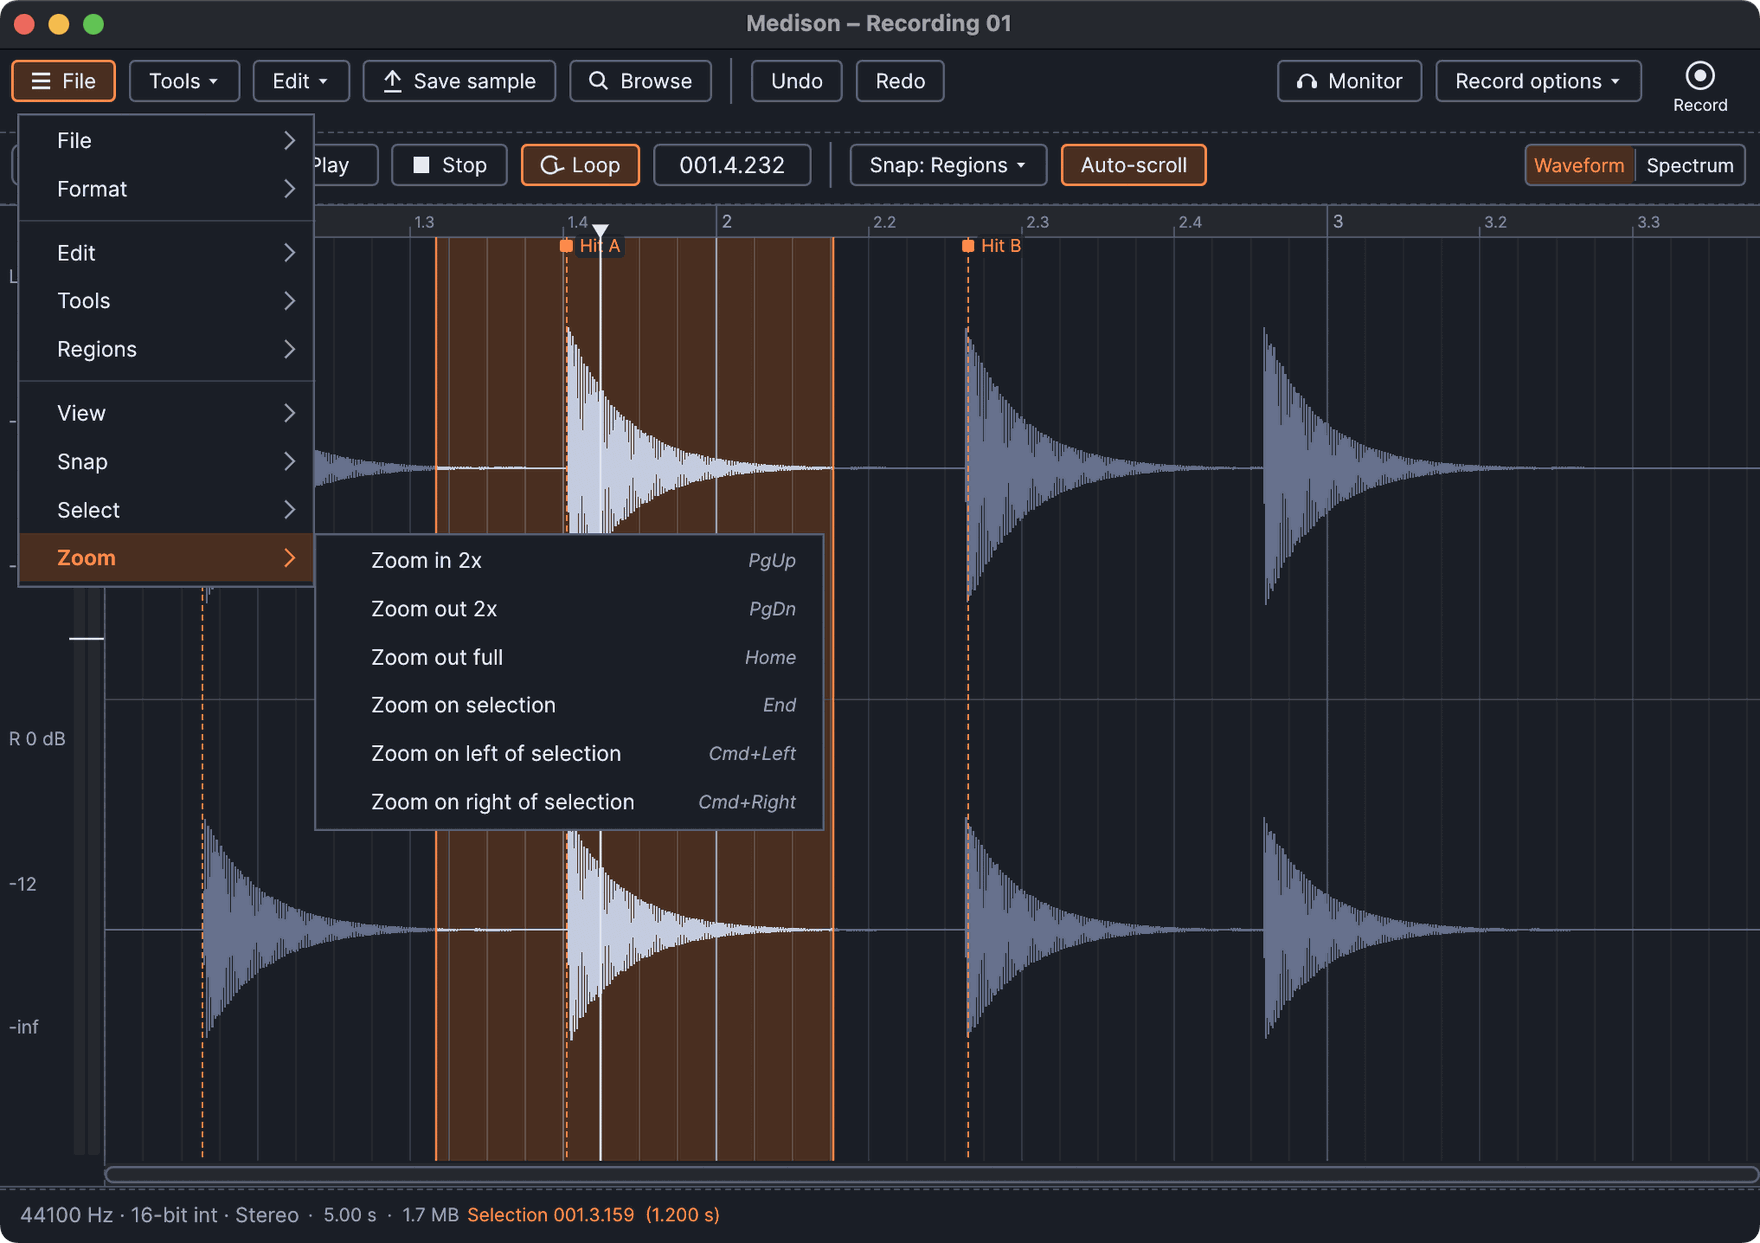
- Zoom in 2x PgUp - Zooms in 2 times.
- Zoom out 2x PgDn - Zooms out 2 times.
- Zoom out full Home - Displays the full sample.
- Zoom on selection End - Zooms the selection to fill the Sample Edit Window.
- Zoom on left of selection CtrlLeft - Centers the Sample Edit Window on the right edge of the selection at maximum zoom.
- Zoom on right of selection CtrlRight - Centers the Sample Edit Window on the left edge of the selection at maximum zoom.
Preferences
Open Preferences from File > Preferences... or with Cmd,.
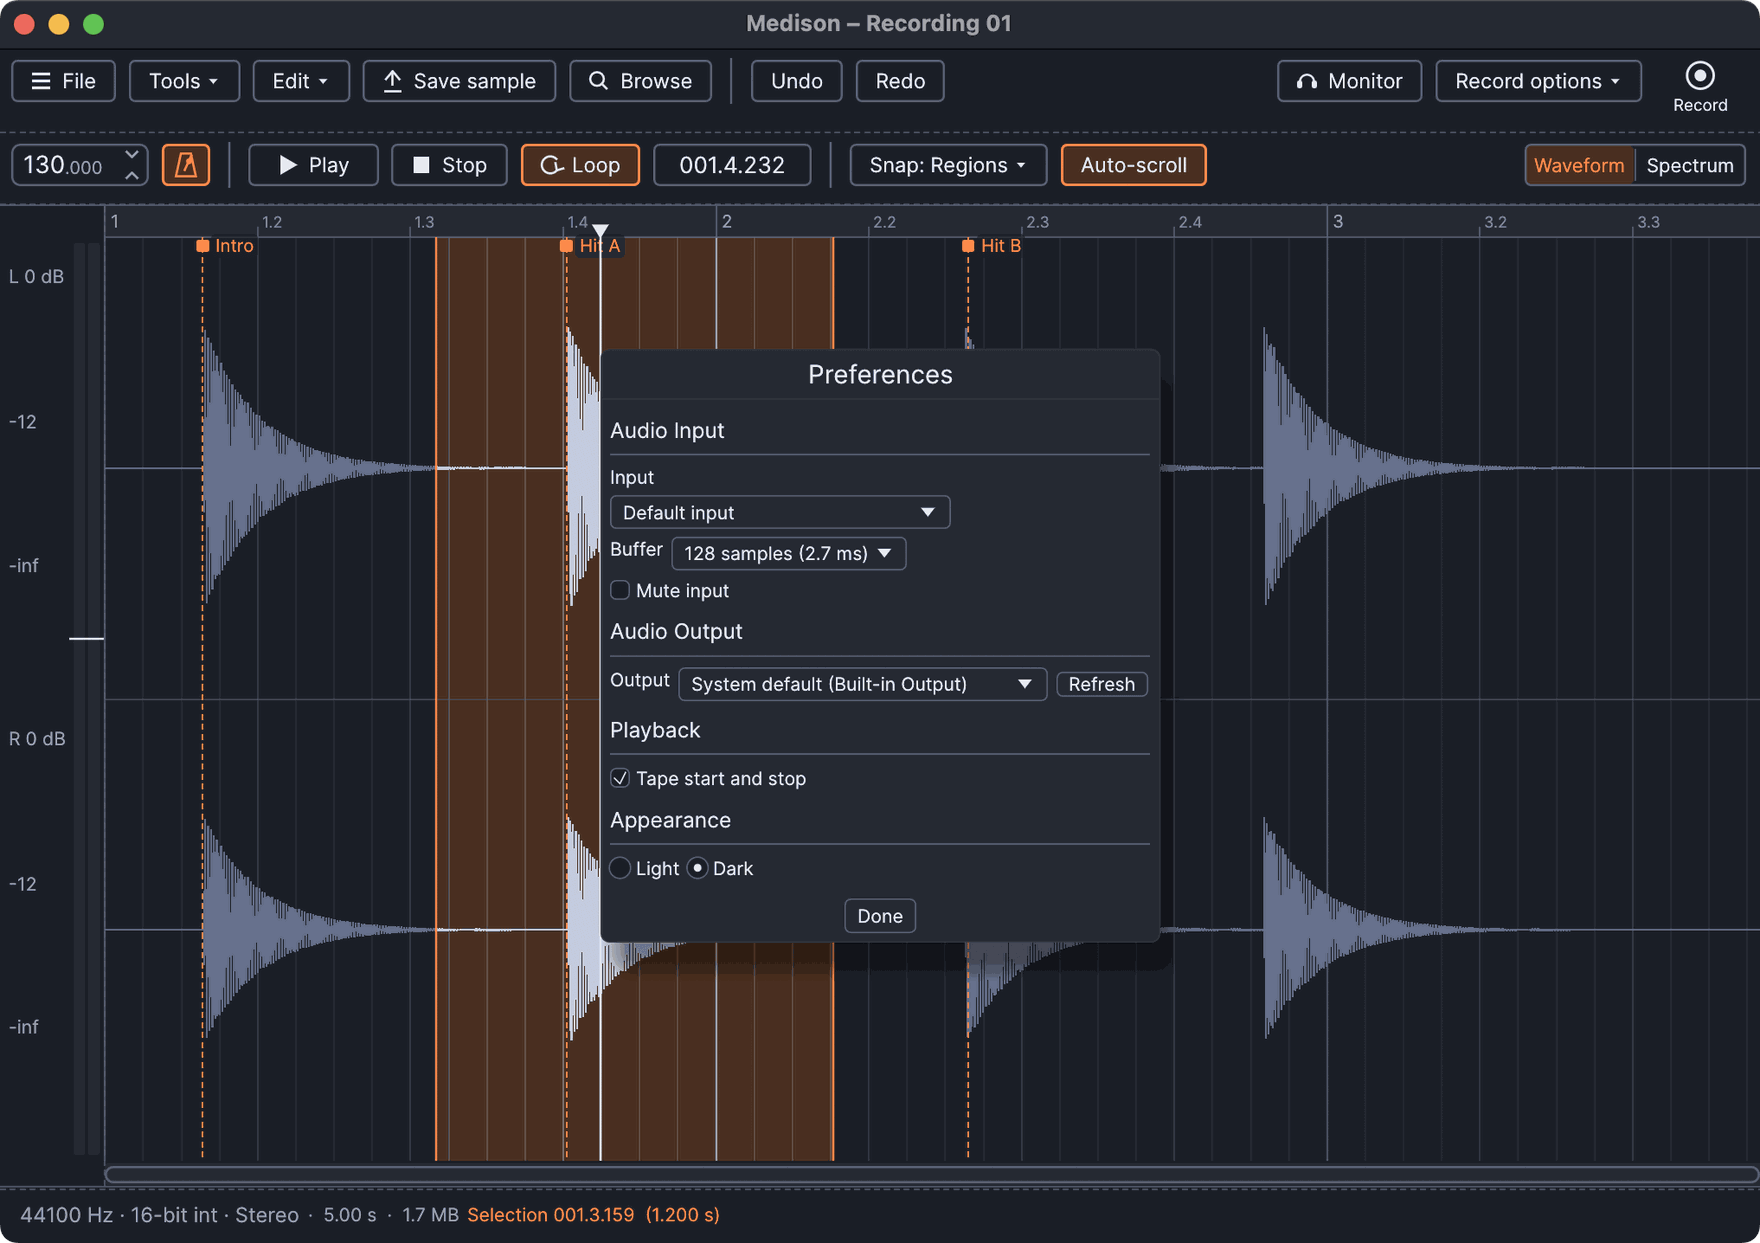
- Audio Input - The input device, the buffer size and Mute input. Append and the start and duration options stay in Record options.
- Audio Output - Chooses which of the system's audio outputs Medison plays to, or the system default.
- Playback - Turns the tape start and stop effect on or off.
- Appearance - Switches between the light and dark themes.
Scrolling and zooming
- Zoom - Pinch on a trackpad, or scroll sideways, to zoom in and out around the pointer. The PgUp and PgDn keys zoom by two, and Home shows the whole sample.
- Scroll - Scroll vertically, or hold Shift and scroll sideways, to move along the waveform. You can also drag the scroll bar below it, or drag with the middle mouse button.
- Select without snapping - Hold Cmd (Ctrl on Windows and Linux) while you drag a selection to ignore the snap setting.
Sample Edit Functions
From left to right:
- Undo / undo history – Left-click to undo the last action. Right-click to display the last 10 actions (Left-click the point in the history you wish to return to).
- Normalize / normalize regions – Left-click to normalize the current selection. Right-click to normalize on a per-region basis.
- Trim side noise / gate noise – Left-click trims noise outside the selected region. Right-click gates noise below threshold.
- Fade in / declick in – Left-click fades in. Right-click smooths in (removes clicks).
- Fade out / declick out – Left-click fades out. Right-click smooths out (removes clicks).
- Add / remove marker / region – Left-click adds/removes a marker at the start of the selected region. Right-click adds region markers bounding the selection. Shift+Right-click invokes temporary zoom. A Marker is a position flag with optional name, description and middle note. A Region is a marker plus an end point. Right-click markers to set name, trigger note, etc.
- Auto-slice – Auto-slices the sample.
- Tune loop / set loop – Left-click opens the Tune Loop Tool. Right-click sets loop points bounding the current selection.
- Save as… / save as compressed… – Opens a save dialog with .wav and compressed .wav (ogg) options.
-
Drag / copy sample / move selection – Left-click and drag the button to copy/move the selected region (or whole sample) to any compatible location (Sampler, Slicer, DirectWave, Playlist, etc.). Right-click copies the selection to the clipboard. NOTE: Other export options are under Tools > Sequencing.
- Send to Playlist as audio clip ShiftC – Dumps the selection to the Playlist.
- Send to selected channel – Dumps the selection to the selected Channel.
Special Controls
There are a number of important and or less obvious controls, described below:
- Recording duration - Set in time, file size or unlimited (forever - or until you run out of memory).
- Mute input - When recording in Medison click here to mute/unmute the audio input.
- Auto scrolling - When the sample is zoomed this enables/disables the auto scrolling function.
Peak Meter
The peak meter has some special features.
- Read value - Hover at the point of interest (peaks for example) to show the value in the Hint Bar.
Sample Edit Window
You can edit the sample, set markers/loop-points, or apply envelopes to the sound. Generally Sample Edit Functions will only apply to the selected region of the sample in the Edit Window.
How to
- Maximize Medison - Click on Medison to focus it, then press enter on your keyboard.
- Edit a sample - Make sure 'Waveform Edit Mode' 'Edit Sample' is selected.
- Make a selection - Left-click and drag horizontally over the region to be selected. The selection will turn red.
- Modify the start and end points of a selection - Left-click outside the selection and the start or end point will jump to the new location (depending if you click before or after the selection).
- Select a region defined by markers - Hold Ctrl and Left-click on the square tag at the top of a region marker OR double-click on a region marker. A selected region will turn red.
- Deselect selection / region - Press the (down-arrow) on your keyboard OR double-click outside the selection/selected region.
- Cut/Copy - To Cut a selection press CtrlX. To Copy a selection press CtrlC. These functions can also be accessed from the Edit menu button.
- Paste insert - First make a small selection (length does not matter) starting at the precise location where you want the paste insert to start and press CtrlV. NOTE: The pasted data will be inserted from the start point of the selected region. All sample data after this point, including the selected region will be moved after the pasted data. This function can also be accessed from the Edit menu button.
- Paste replace - First make a small selection starting at the precise location where you want the paste replace to start and press AltV. NOTE: The pasted data will be inserted from the start point of the selected region over any sample data after this point, including the selected region. This function can also be accessed from the Edit menu button.
- Drag & drop samples - You can drag samples from many locations and drop them on Medison to load them. Holding Shift while dragging and dropping a sample onto Medison will append the dragged sample to the end of the existing data. Holding Alt will replace the region. A slice marker with the original samples name will be added at the splice point.
- Clear selection - Hold ShiftDel on your keyboard. The selection will be cleared without changing the sample length. This function can also be accessed from the Edit menu button.
- Delete selected - Press the Del key on your keyboard. The selection will be deleted and the sample length reduced. This function can also be accessed from the Edit menu button.
- Apply Envelopes (Pan/Volume/Stereo Separation) - Select the envelope type 'Envelope Selector' and Right-click to add points, Left-click to move points and tension markers. To apply the envelope/s press CtrlE or select Tools > Amp > Mixdown amp envelopes. The undo function can be used to reverse any unwanted changes.
- Zoom - Hover over the window and scroll the mouse-wheel or Left-click an edge of the Zoom/Scroll Bar (a double-headed arrow will appear), then drag horizontally.
- Horizontal Scroll - Hold the shift key and then scroll the mouse-wheel or Left-click in the middle of the highlighted section of the Zoom/Scroll Bar, then drag horizontally.
- Zoom/Scroll - Click the mouse-wheel or middle mouse button and move up/down (zoom) and left/right (scroll).
- Manual tempo setting using a selection - The manual tempo detection technique is to highlight a part of the audio that you know to be an exact # of beats, then the properties dialog F2 will show 'Selection (beats)' instead of 'Length (beats)'. If 4 beats were highlighted (for example), enter 4, and the tempo of the song should be detected.
- Manual grid/tempo alignment using downbeat - Right-Ctrl + Right-Shift + Click on the location in the sample where the first downbeat marker is to be set, hold and drag horizontally to fine-tune the position if needed. Then, release the mouse button and click again with the Right-Ctrl + Right-Shift keys still held (drag left/right) to adjust the grid spacing to align the grid to the beat. NOTE: Correct tempo/grid alignment assumes you have set the tempo AND Sync is selected in the Sample Properties.
Waveform View
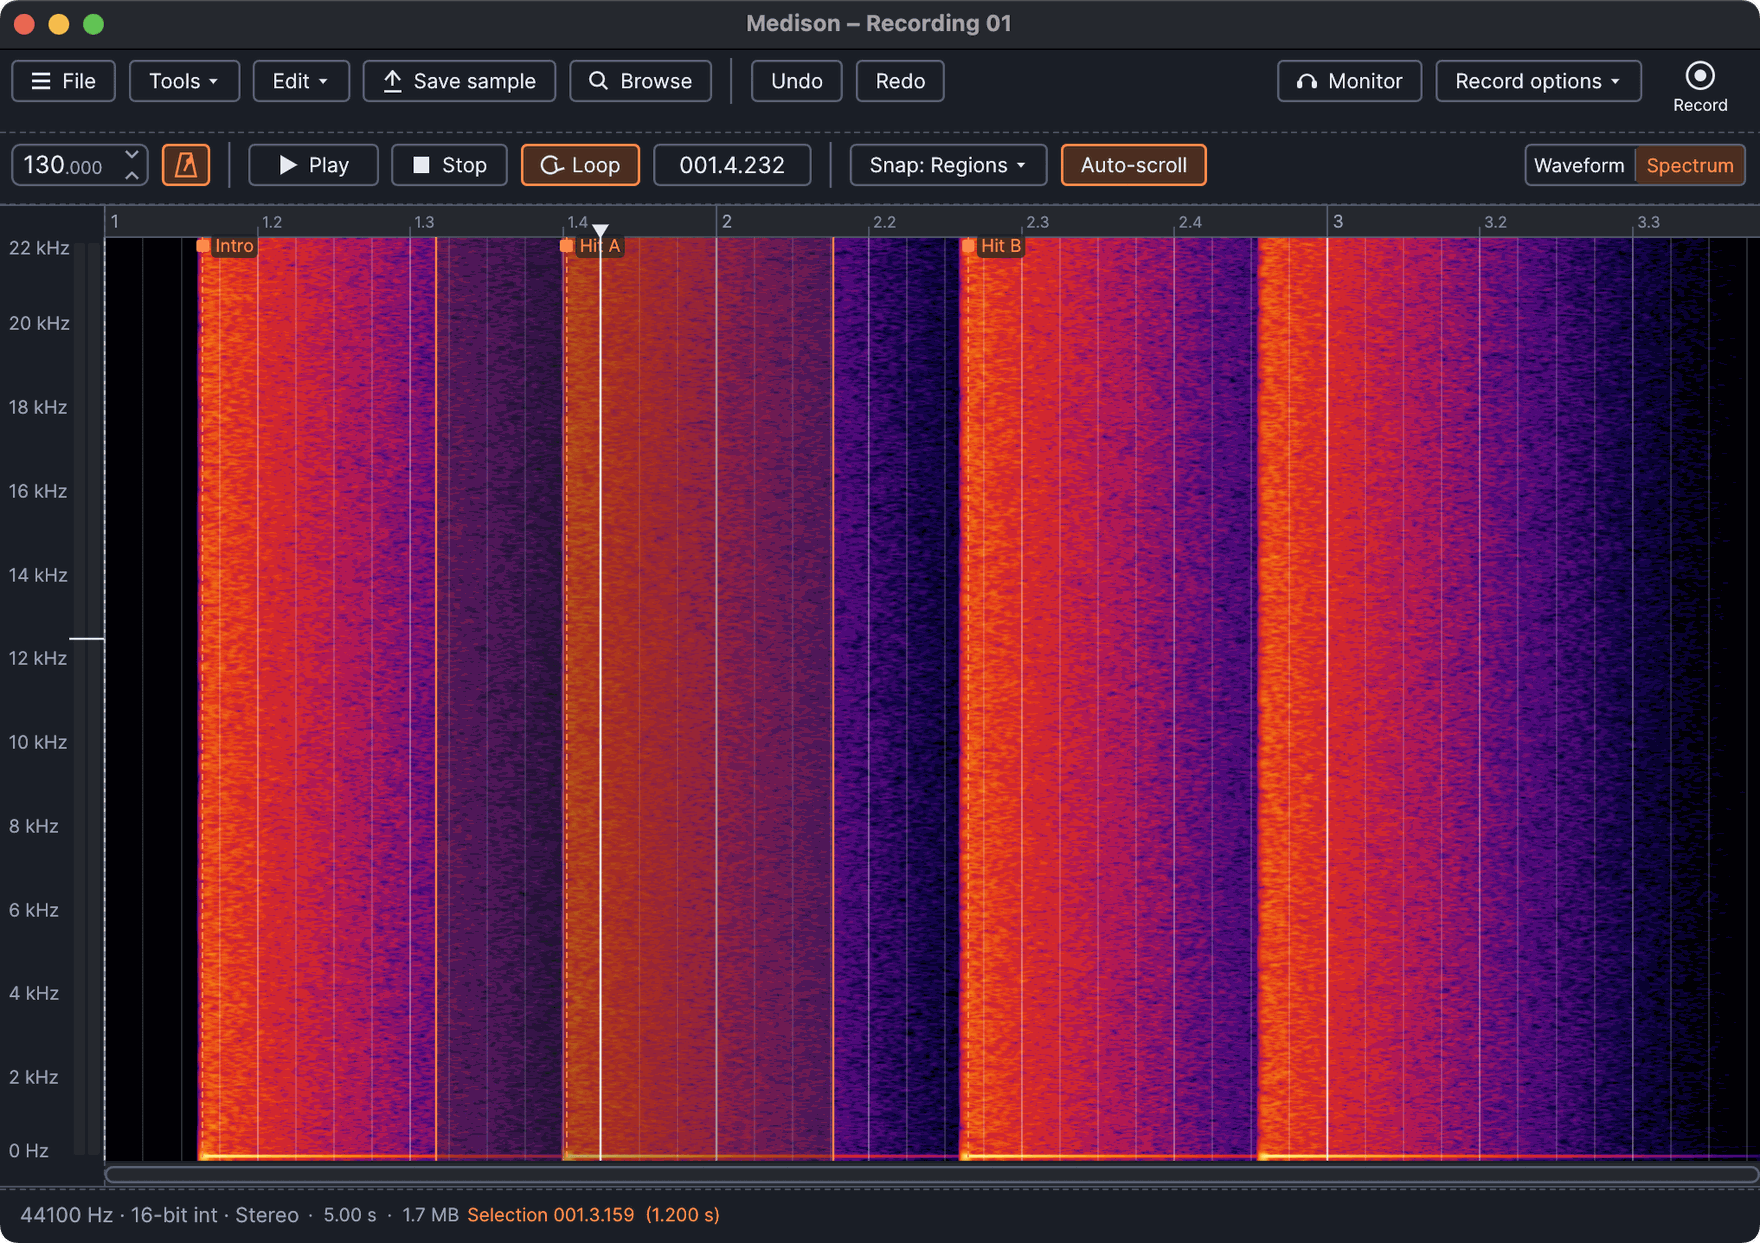
To swap between Waveform and Spectral view use the Display Mode switch. There is also a 'Dual view' option under the View Menu Button .
These switches vary, depending on the Edit mode, from left to right:
- Auto scrolling – When the sample is zoomed this enables or disables automatic scrolling.
- Display mode – Swap between waveform and spectrum display. There is also a dual view option.
- Regions – Enables or disables the region marker display. A region is defined by a pair of region markers.
- Click free editing – Performs a short fade-in / fade-out on selected, cut, and processed regions to reduce clicks.
- Snap – Enables or disables snapping. Applies to envelopes and sample edit functions.
- Slide – Slides the selected envelope control point and all following points without changing their relative spacing.
Zoom/Scroll Bar
The Zoom/ Scroll bar is useful when working on long sounds.
- Zoom - Left-click the right or left edge of the highlighted section of the bar (a double-headed arrow will appear), then drag horizontally.
- Scroll - Left-click in the middle of the highlighted section of the bar, then drag horizontally.
- Zoom/Scroll - Click the mouse-wheel or middle mouse button and move up/down (zoom) and left/right (scroll).
Time/Sample Display
The time display shows the time-base in either samples or seconds. To change between the two types, Left-click on the Sample Edit Window and select View > Time in samples. Some useful editing features can be accessed by Right-clicking on the number readout (Time/Samples above):
- Deselect Up arrow - Deselects the current selection.
- Select before current selection - Selects the area before the current selection.
- Select after current selection - Selects the area after the current selection.
- Select zoomed part CtrlA - Selects the region defined by the visible sample.
- Select previous region Left arrow - Selects the previous region.
- Select next region Right arrow - Selects the next region.
Sample Properties (F2)
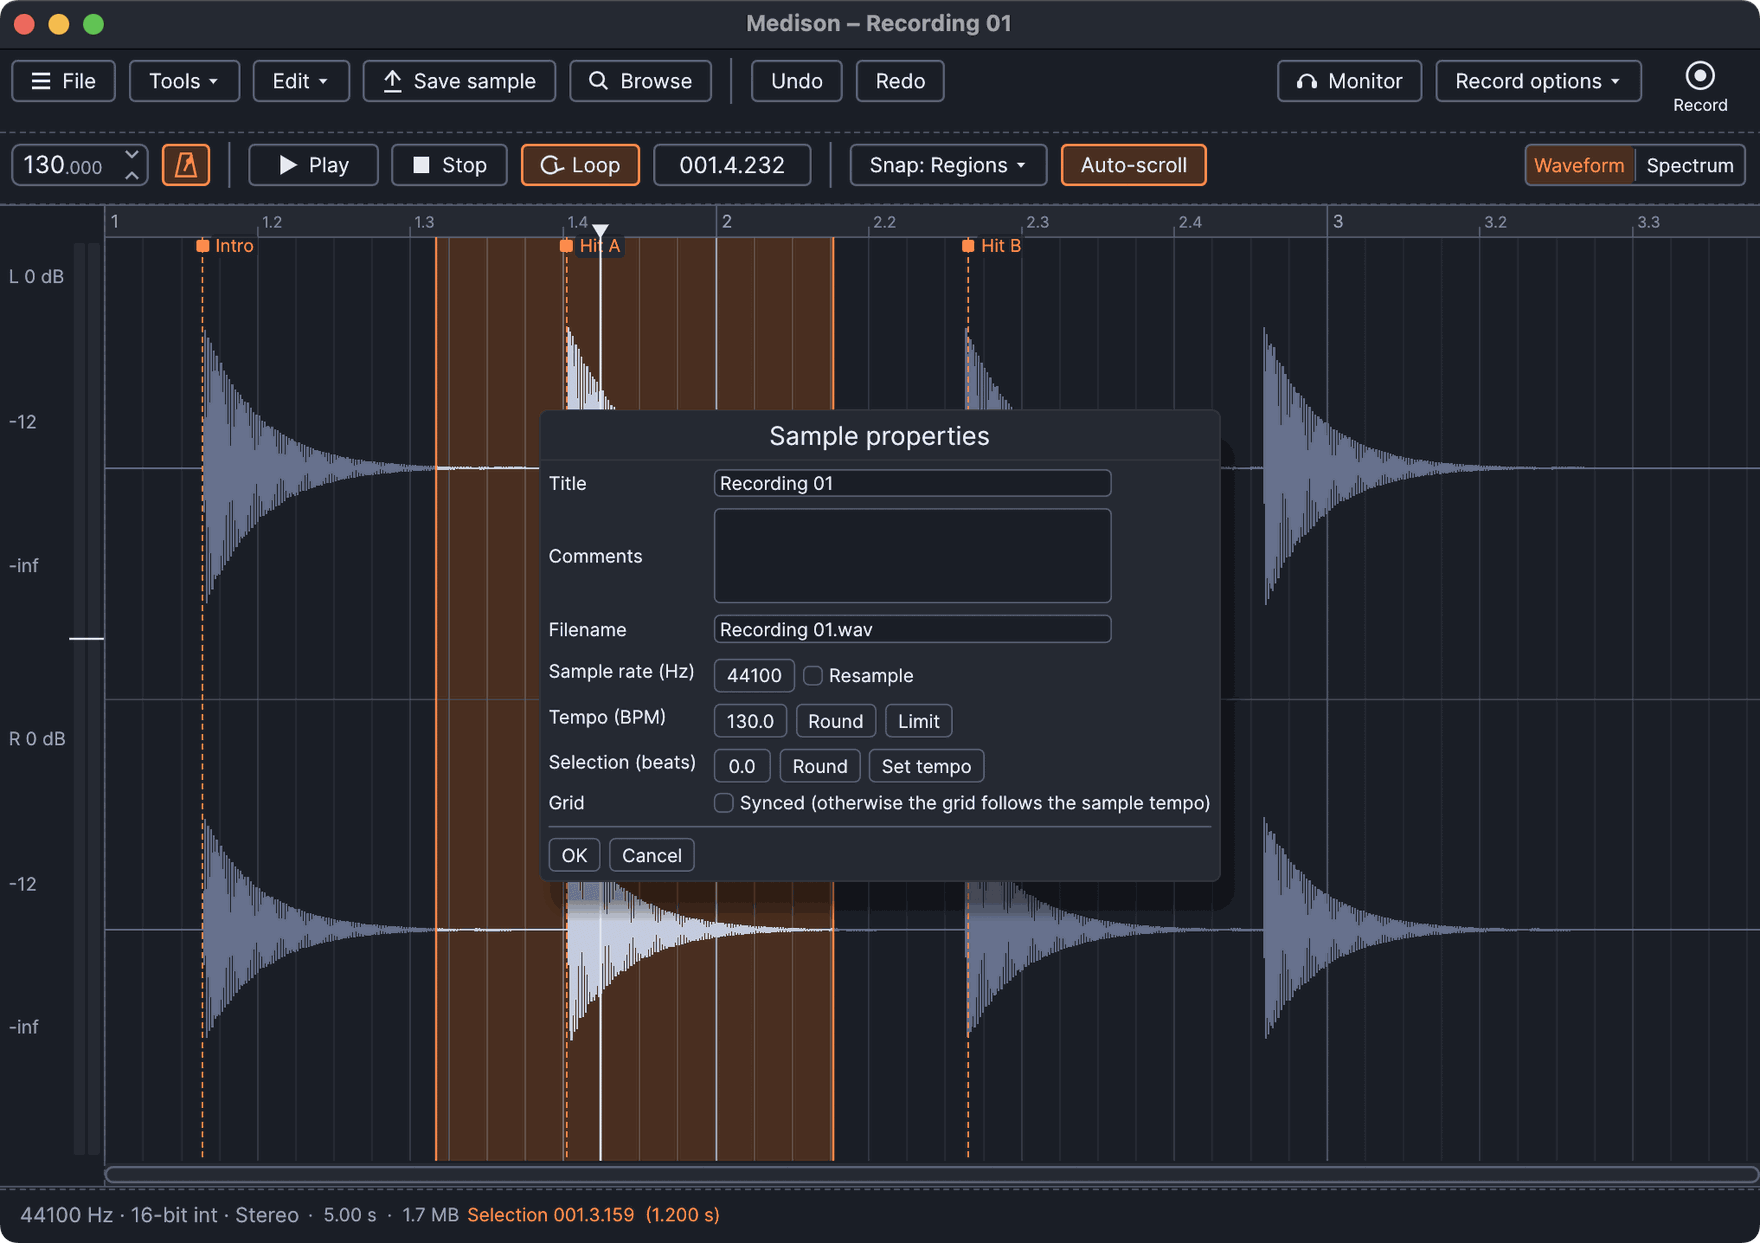
This area displays the sample properties including: Sample rate, Bit depth, Channel format, Tempo information and Title. Some items are clickable, as noted below:
- Samplerate (Information) - Sample rate for the loaded sample.
-
Format (Clickable) - There are two options:
- Bit depth - Click to change between 16 and 32 Bit. NOTES: Operations that affect amplitude will automatically change samples from 16 to 32 bit to preserve fidelity. When converting from 32 > 16 Bit, this is a lossy operation. You can use CtrlAltZ to undo.
- Channels - Click to covert to Mono (single channel sample). NOTE: Converting from Stereo to Mono is a lossy operation. Information is lost. Use CtrlAltZ to undo.
- Tempo (Information) - Embedded tempo.
- Synced / Free (Clickable) - Controls the background grid in Medison. When Synced the grid reflects the project tempo. When Free, the grid will snap to the samples tempo.
- Title - Sample title.
- Right-clicking this area or pressing F2 opens the Sample Properties dialog as shown below.
Info
- Title - Names the sample.
- Comments - These comments will show in the sample properties.
- Filename - Change or set the file name for the sample. NOTE: If you change a samples file name, the original file/sample will be used in any existing projects.
Format
- Sample rate (Hz) - Sets the sample rate.
- Resample (switch) - Selecting this switch forces resampling of the sample data to the desired samplerate. If this switch is off the sample rate changes only the playback sample rate (speed) without modifying the data. For example, choose to either resample data to 22kHz (data reduction), or to play existing data at 22kHz (pitch-shift).
- Format - Choose between 16-Bit integer & 32-Bit floating point formats. Mono or Stereo. NOTE: Medison automatically converts data to 32-Bit before applying any function that modifies the sample data. It is better to apply several edits in 32-Bit floating point, than convert to 16-Bit integer after each edit.
Tempo
-
Tempo BPM - Sets the tempo in Beats Per Minute. If 'tempo-sync' is selected, setting a tempo here will cause Medison to stretch/pitch-shift the sample according to this value when loaded.
- Round - Rounds the tempo (removes decimals).
- Limit - Corrects any double/half tempo problems (range options appear when the button is selected).
-
Length (beats) / Selection (beats) - Enter the number of beats in the sample or selection. 'Sel (beats)' appears if a selection has been made (enter the number of beats in the selection). Used when slicing & beat detecting (see below).
- Round - Rounds the number of beats (removes decimals).
- Tempo-sync - When selected - Instructs Medison to stretch (beatmatch) the sample to the Master tempo of the project (Audio clips & Channel sampler). The F10 General Settings, 'Read sample tempo information' option MUST BE ON. See the section on Time-stretching & Pitch-shifting in the Sampler Channel Settings section for more details. NOTE: When the option is selected, and nothing is set in the field, the host tempo will be used. Left-click in the field to manually enter a tempo.
- Manual tempo setting - The manual tempo detection technique is to highlight a part of the audio that you know to be an exact number of beats, then the properties dialog F2 will show 'Selection (beats)' instead of 'Length (beats)'. If 4 beats were highlighted (for example), enter 4, and the tempo of the song should be detected.
- Manual grid alignment - Right-Ctrl + Right-Shift + Click on the location in the sample where the first downbeat marker is to be set, hold and drag horizontally to fine-tune the position if needed. Then, release the mouse button and click again with the Right-Ctrl + Right-Shift keys still held (drag left/right) to adjust the grid spacing to align the grid to the beat.